Prerequisites
- iOS 9 or later.
- Xcode 14 or later.
- Application Id provided in Admost Mediation Dashboard.
- Zone Id(s) provided in Admost Mediation Dashboard.
For testing you can use following Ids;
Application Id: @"15066ddc-9c18-492c-8185-bea7e4c7f88c"
Banner Zone Id: @"b4009772-de04-42c4-bbaa-c18da9e4a1ab"
Interstitial Zone Id: @"39f74377-5682-436a-9338-9d1c4df410bd"
RewardedVideo Zone Id: @"2bdefd44-5269-4cbc-b93a-373b74a2f067"
Offerwall Zone Id: @"1cadca08-33f9-4da7-969e-ef116d4e7d0e"
Ad Networks
Setup
You can install AMR SDK and mediation adapters using CocoaPods (recommended) or if you want to integrate AMR SDK manually, please read the manuel integration guide.
Installation


CocoaPods is a dependency manager for Swift and Objective-C Cocoa projects which automates and simplifies the process of using 3rd-party libraries like AMR in your projects. See getting started guide for more information on installing cocoapods.
Create your podfile and install
At least one mediation adapter is required for AMRSDK to show banners. You can add all adapters (recommended for maximized revenue) or start with a subset of adapters. Consult your AMR agent for further details.
Please click + icon to add to list and - to remove from list.
Podfile will be updated while you are choosing networks.
To integrate AMR SDK and mediation adapters into your Xcode project using CocoaPods, specify it in
your Podfile:
Then, run the following command:
$ pod installSKAdNetwork
With the iOS 14, you need to add SKAdNetwork ids to your Info.plist file to support conversion tracking.
Add following code to your Info.plist file:
PLEASE SELECT ONE OR MORE NETWORKS TO CREATE YOUR SKADNETWORK LIST.After you complete pod installation you can skip to Xcode Setup step.
Xcode Setup
Add following lines to your plist file.
<key>NSAppTransportSecurity</key>
<dict>
    <key>NSExceptionDomains</key>
    <dict>
        <key>admost.com</key>
        <dict>
            <key>NSExceptionAllowsInsecureHTTPLoads</key>
            <true/>
            <key>NSIncludesSubdomains</key>
            <true/>
        </dict>
    </dict>
</dict>
<key>NSCalendarsUsageDescription</key>
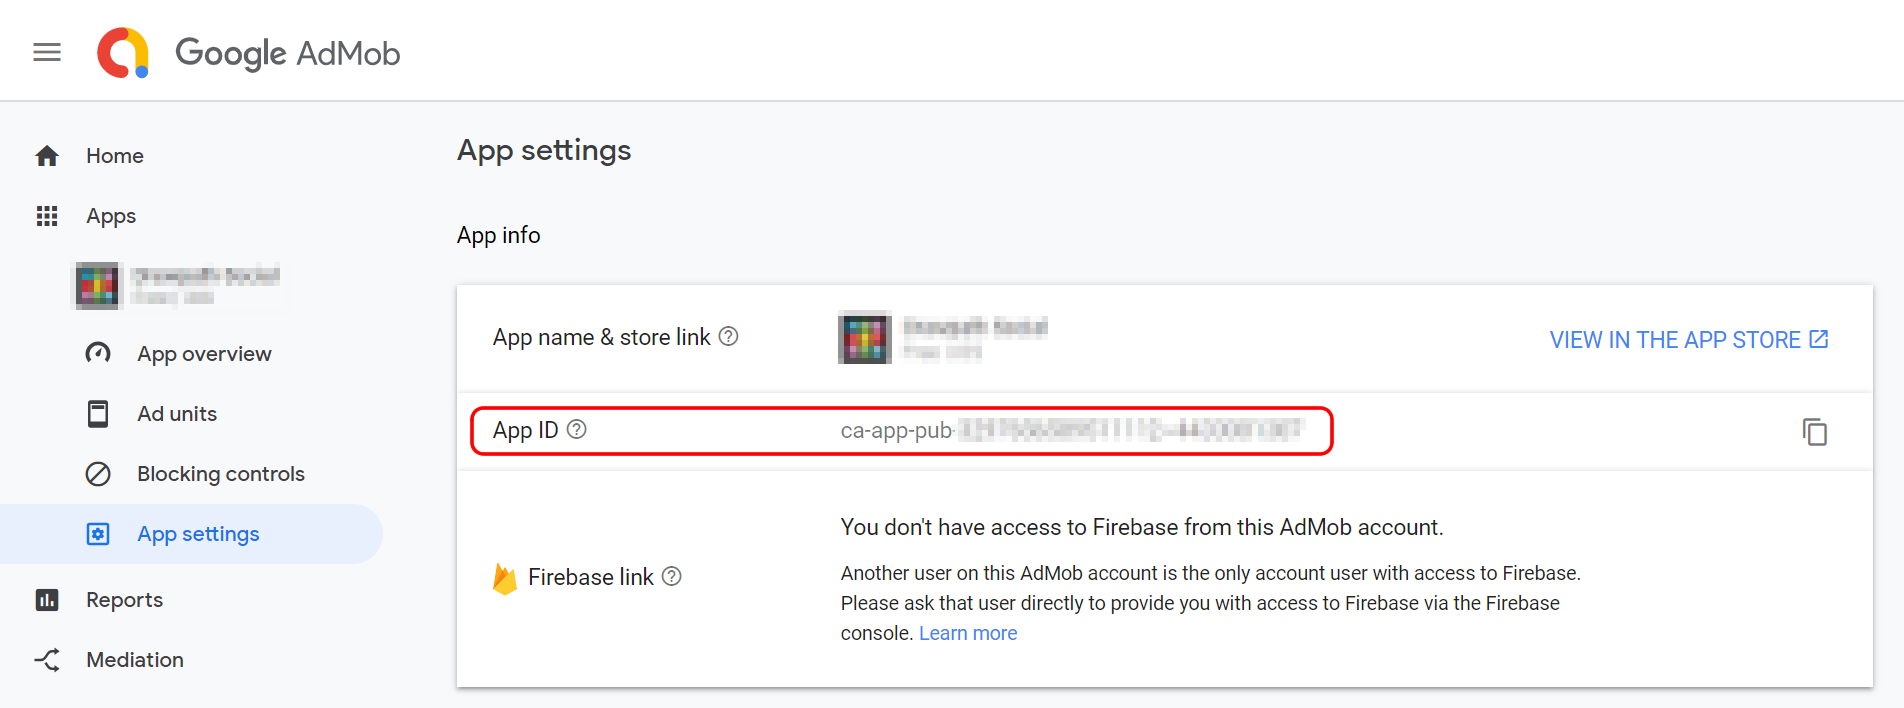
<string>Some ad content may access calendar</string>Important If you are using AdMob you must add your AdMob App ID to your plist file with GADApplicationIdentifier key as shown below.
(Replace ca-app-pub-XXXXXXXXXXXXXXXX~XXXXXXXXXX with your own App ID)
<key>GADApplicationIdentifier</key>
<string>ca-app-pub-XXXXXXXXXXXXXXXX~XXXXXXXXXX</string>
Your App ID can be found on AdMob dashboard -> Apps -> App settings -> App info.
Important If you are using Pollfish you must update and add Pollfish Policy to your privacy policy file.
Optional If you are using AdColony you need to add following code to your plist file.
<key>LSApplicationQueriesSchemes</key>
<array>
    <string>fb</string>
    <string>instagram</string>
    <string>tumblr</string>
    <string>twitter</string>
</array>
New iOS 14
Starting with iOS 14, apps will be required to ask users for permission to access IDFA. In order to ask for this permission and display the App Tracking Transparency authorization request for accessing the IDFA, you will need to add NSUserTrackingUsageDescription key to Info.plist file.
<key>NSUserTrackingUsageDescription</key>
<string>Your awesome message to encourage user to give permission to access IDFA</string>
To present the authorization request, call requestTrackingAuthorizationWithCompletionHandler:
#import <AppTrackingTransparency/AppTrackingTransparency.h>
#import <AdSupport/AdSupport.h>

...
if (@available(iOS 14.5, *)) {
    [ATTrackingManager requestTrackingAuthorizationWithCompletionHandler:^(ATTrackingManagerAuthorizationStatus status) {
        + (void)updateATTStatus {
            [AMRAnalytics checkVersionUpdate];
        }
        // Tracking authorization completed.
    }];
}
import AppTrackingTransparency
import AdSupport
...
if #available(iOS 14.5, *) {
    ATTrackingManager.requestTrackingAuthorization(completionHandler: { status in
        AMRSDK.updateATTStatus()
        // Tracking authorization completed.
    })
}
User is prompted with following popup after requestTrackingAuthorizationWithCompletionHandler call.
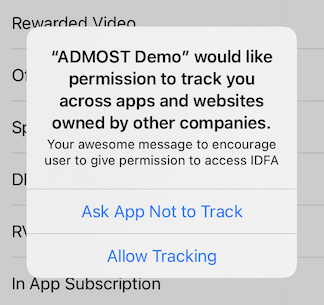
Please see ATTrackingManager.AuthorizationStatus for possible return values.
Usage
Initialization
To initialize Admost Mediation SDK, import AMRSDK.h to your AppDelegate
file;
#import <AMRSDK/AMRSDK.h>import AMRSDKand initialize AMRSDK with your Application Id in didFinishLaunchingWithOptions
callback;
- (BOOL)application:(UIApplication *)application
didFinishLaunchingWithOptions:(NSDictionary *)launchOptions {

    //Privacy COMPLIANCE
    [AMRSDK setUserConsent:YES];
    [AMRSDK subjectToGDPR:NO];
    [AMRSDK subjectToCCPA:NO];

    [AMRSDK startWithAppId:@"<appId>"];

        return YES;
}
func application(_ application: UIApplication, didFinishLaunchingWithOptions launchOptions:
[UIApplication.LaunchOptionsKey: Any]?) -> Bool {

    //GDPR COMPLIANCE
    AMRSDK.setUserConsent(true)
    AMRSDK.subject(toGDPR: false)
    AMRSDK.subject(toCCPA: false)

    AMRSDK.start(withAppId:"<appId>")

        return true
}
For testing you can use following Application Id;
Application Id: @"15066ddc-9c18-492c-8185-bea7e4c7f88c"
COPPA
You can use following method, if you want to show age-restricted ads;
[AMRSDK setUserChild:YES];
AMRSDK.setUserChild(true)
GDPR and CCPA
Once you have collected the user’s consent, you can pass it onto the SDK using the init configuration parameters shown above.
setUserConsent has a boolean parameter. If you have the user’s consent, set it YES. If you do not have the user's consent, set it NO.
subjectToGDPR has a boolean parameter. If you know the user is subject to GDPR, set it YES. If you know the user is not subject to GDPR, set it NO.
subjectToCCPA has a boolean parameter. If you know the user is subject to CCPA, set it YES. If you know the user is not subject to CCPA, set it NO.
If you don’t pass the user’s consent or subjectToGDPR to the SDK, the rules described in GDPR have been applied.
If you don’t pass the user’s consent or subjectToCCPA to the SDK, the rules described in CCPA have been applied.
Banner Ads
Important
Default banner size changed from Fullscreen width to 320x50, 728x90 and 300x250.
If you are using 320x90 banner, please contact with your account manager.
There are 3 types of banner size; 320x50, 728x90 and 300x250 banner.
To create and show a banner ad first import AMRSDK.h to your
UIViewController file and declare an AMRBanner *mpuBanner property;
// ViewController.h

#import <AMRSDK/AMRSDK.h>

@interface ViewController : UIViewController <AMRBannerDelegate>

@property(nonatomic, strong) AMRBanner *mpuBanner;

@end
// ViewController

import AMRSDK

class ViewController : UIViewController, AMRBannerDelegate {

var AMRBanner *mpuBanner!

}
Initialize it with your Banner Zone Id and set it's
delegate to an object (generally your viewController) which conforms to <AMRBannerDelegate>
protocol.
// ViewController.m

mpuBanner = [AMRBanner bannerForZoneId:@"<zoneId>"];
mpuBanner.delegate = self;
// ViewController

mpuBanner = AMRBanner.init(forZoneId:"<zoneId>")
mpuBanner.delegate = self
For testing you can use following Banner Zone Id;
Banner Zone Id: @"b4009772-de04-42c4-bbaa-c18da9e4a1ab"
Optionally you can set the width of the banner, default value is 320px for 50px banner, 728px for 90px banner, 300px for 250px banner.
mpuBanner.bannerWidth = [UIScreen mainScreen].bounds.size.width;mpuBanner.bannerWidth = UIScreen.main.bounds.size.widthStart loading banner with loadBanner method and wait for the
<AMRBannerDelegate> protocol callbacks.
[mpuBanner loadBanner];mpuBanner.load()There are 3 callback methods in AMRBannerDelegate protocol.
When didReceiveBanner callback method is called just add banner's
bannerView as a subview on your viewcontroller to show banner.
- (void)didReceiveBanner:(AMRBanner *)banner {
    [self.view addSubview:banner.bannerView];
}
func didReceive(_ banner: AMRBanner!) {
self.view.addSubview(banner.bannerView)
}If didFailToReceiveBanner callback method is called investigate error to adress the
problem.
- (void)didFailToReceiveBanner:(AMRBanner *)banner error:(AMRError *)error {
    NSLog(error.errorDescription);
}
func didFail(toReceive banner: AMRBanner!, error: AMRError!) {
print(error.errorDescription)
}New didClickBanner callback method is called when banner clicked.
- (void)didClickBanner:(AMRBanner *)banner {
    NSLog(@"Banner clicked.");
}
func didClick(_ banner: AMRBanner!) {
print("Banner clicked.")
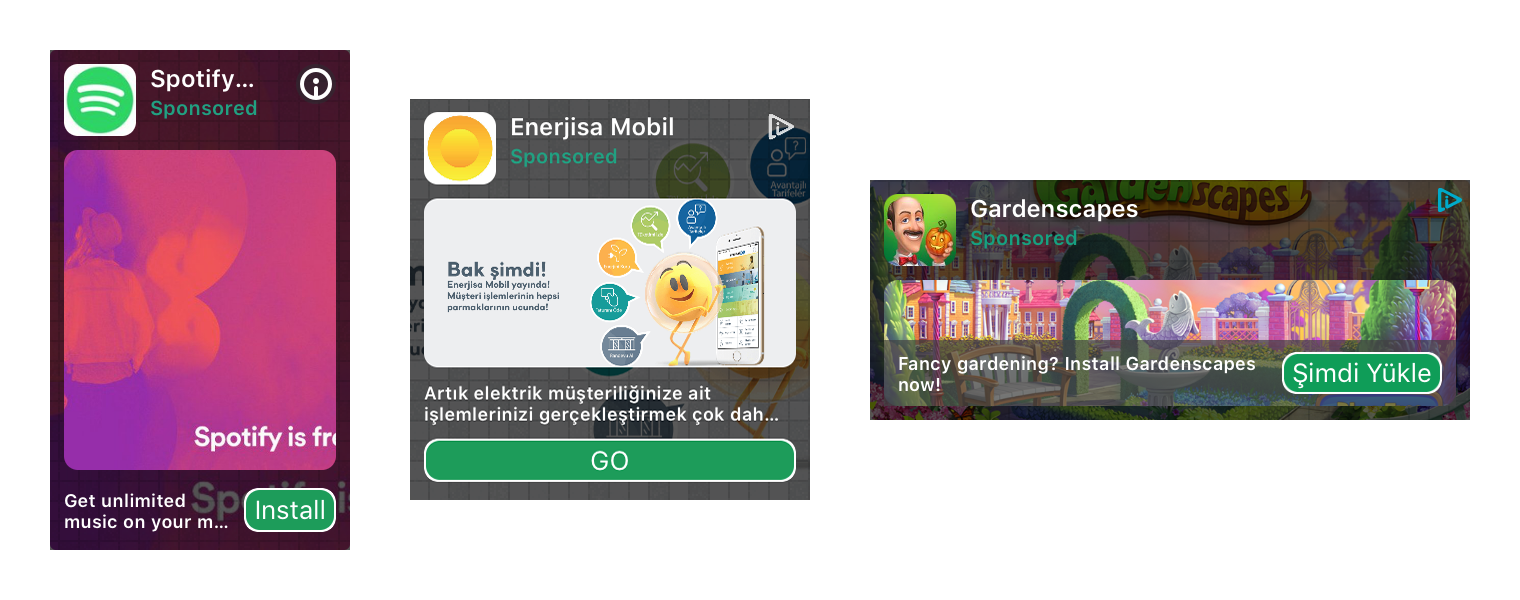
}Customize Native Ad Appearance (Optional)
You can change the appearance of native ads to suit your application's design. Download CustomXibs files and add them to your project.
You can change the layout and design of following assets;
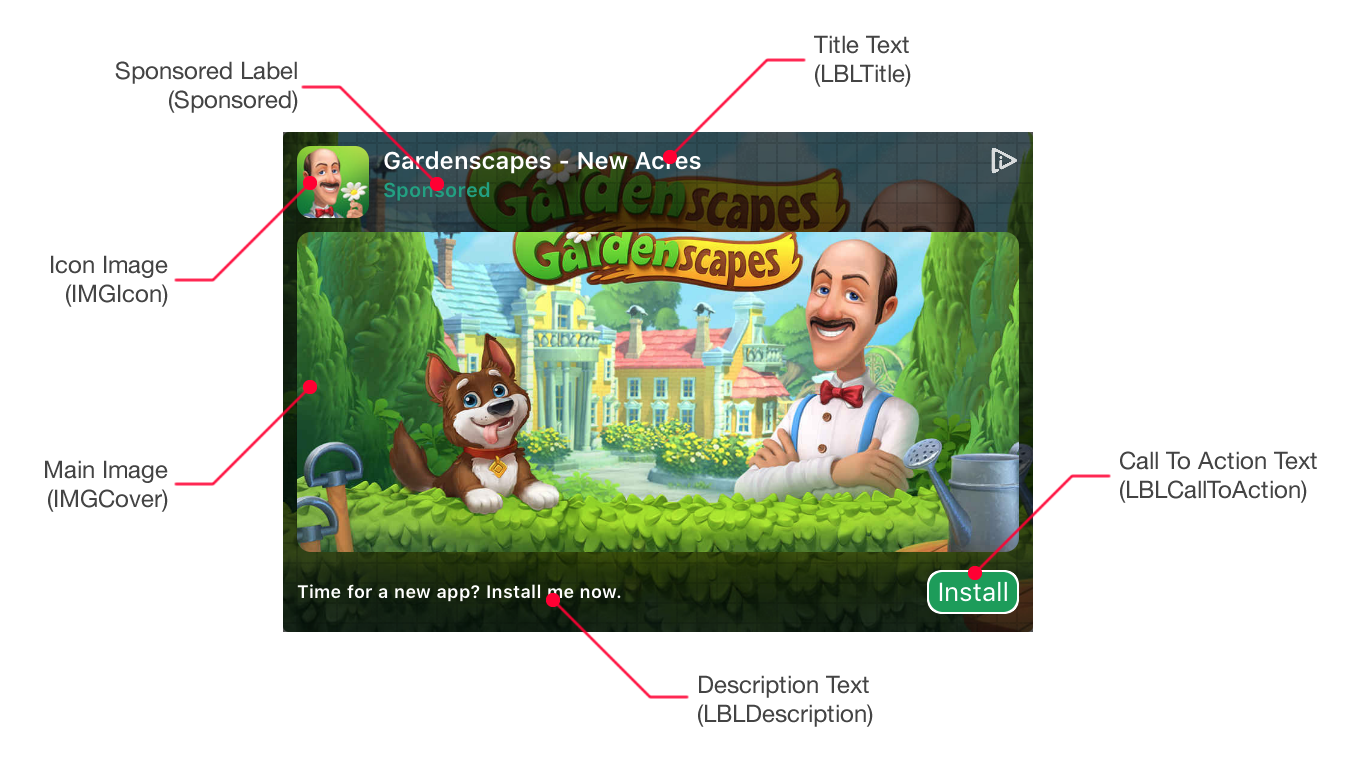
If you want to use your own layouts you can create a copy and modify one of the custom sized samples (CustomNative150x250.xib, CustomNative200x200.xib or CustomNative300x120.xib) and change their frame to fit your design.
To use your own custom native xibs you have set the name and size of the custom xib explicitly as follows;
            _bannerCustom200x200 = [AMRBanner bannerForZoneId:@"<zoneId>"];
            _bannerCustom200x200.delegate = self;
            _bannerCustom200x200.customNativeSize = CGSizeMake(200, 200);
            _bannerCustom200x200.customeNativeXibName = @"CustomNative200x200";
            [_bannerCustom200x200 loadBanner];
            bannerCustom200x200 = AMRBanner.init(forZoneId:"<zoneId>")
            bannerCustom200x200.delegate = self
            bannerCustom200x200.customNativeSize = CGSize(width: 200.0, height: 200.0)
            bannerCustom200x200.customeNativeXibName = "CustomNative200x200"
            bannerCustom200x200.load()
Interstitial Ads
To create and show an interstitial ad first import AMRSDK to your UIViewController
file and declare an AMRInterstitial property;
// ViewController.h

#import <AMRSDK/AMRSDK.h>

@interface ViewController : UIViewController <AMRInterstitialDelegate>

@property(nonatomic, strong) AMRInterstitial *fullScreen;

@end
// ViewController

import AMRSDK

class ViewController : UIViewController, AMRInterstitialDelegate {

var fullScreen: AMRInterstitial!

}
Initialize it with your Interstitial Zone Id and
set it's
delegate to an object (generally your viewController) which conforms to
AMRInterstitialDelegate protocol.
// ViewController.m

fullScreen = [AMRInterstitial interstitialForZoneId:@"<zoneId>"];
fullScreen.delegate = self;
[fullScreen loadInterstitial];
// ViewController

fullScreen = AMRInterstitial(forZoneId:"<zoneId>")
fullScreen.delegate = self
fullScreen.load()
For testing you can use following Interstitial Zone Id;
Interstitial Zone Id: @"39f74377-5682-436a-9338-9d1c4df410bd"
There are 6 callback methods in AMRInterstitialDelegate protocol.
When didReceiveInterstitial callback method is called just call the showFromViewController
method to present interstitial from a viewController.
- (void)didReceiveInterstitial:(AMRInterstitial *)interstitial {
    [interstitial showFromViewController:self];
}
func didReceive(_ interstitial: AMRInterstitial!) {
interstitial.show(from: self.navigationController)
}If didFailToReceiveInterstitial callback method is called investigate error
to adress the problem.
Important Attempting to load a new interstitial from the
didFailToReceiveInterstitial
methods is strongly discouraged.
- (void)didFailToReceiveInterstitial:(AMRInterstitial *)interstitial error:(AMRError *)error {
    NSLog(error.errorDescription);
}
func didFail(toReceive interstitial: AMRInterstitial!, error: AMRError!) {
print(error.errorDescription)
}didShowInterstitial callback method is called to inform the application that the received interstital is shown.
- (void)didShowInterstitial:(AMRInterstitial *)interstitial {}func didShow(_ interstitial: AMRInterstitial!) {}didFailToShowInterstitial callback method is called to inform the application that the received interstitial failed to be shown.
This delegate expected to be called very rarely but if it is called you should either load another interstitial or resume tasks.
- (void)didFailToShowInterstitial:(AMRInterstitial *)interstitial error:(AMRError *)error {}
func didFail(toShow interstitial: AMRInterstitial!, error: AMRError!) {}
New didClickInterstitial callback method is called when interstital clicked.
- (void)didClickInterstitial:(AMRInterstitial *)interstitial {}
func didClick(_ interstitial: AMRInterstitial!) {}
didDismissInterstitial callback method is called to inform the application that the
interstitial is closed by clicking cross button/back button. You can use this callback to resume paused tasks during
interstitial presentation.
You can use didDismissInterstitial callback and reload a interstitial ad.
- (void)didDismissInterstitial:(AMRInterstitial *)interstitial {}func didDismiss(_ interstitial: AMRInterstitial!) {}
You can use showFromViewController: method to present interstitial from a viewController.
[interstitial showFromViewController:self];interstitial.show(from: self)You can use tag functionality for interstitial zones. Tags will let you monitor the performance of the ads across different dimensions for the same zone. You can switch ads on and off for any specified tag whenever you want. Example usage is as follows;
[interstitial showFromViewController:self withTag:@"game_start"];interstitial.show(from: self, withTag: "game_start")Rewarded Video Ads
Rewarded video ads' integration is pretty similar to Interstitial ads with 2 additional callbacks. To create and show a rewarded video ad
first import
AMRSDK to your UIViewController file and declare an AMRRewardedVideo property;
// ViewController.h

#import <AMRSDK/AMRSDK.h>

@interface ViewController : UIViewController <AMRRewardedVideoDelegate>

@property(nonatomic, strong) AMRRewardedVideo *rewardedVideo;

@end
// ViewController

import AMRSDK

class ViewController : UIViewController, AMRRewardedVideoDelegate {

var rewardedVideo: AMRRewardedVideo!

}
Initialize it with your RewardedVideo Zone Id
and
set it's
delegate to an object (generally your viewController) which conforms to
AMRRewardedVideoDelegate protocol.
// ViewController.m

rewardedVideo = [AMRRewardedVideo rewardedVideoForZoneId:@"<zoneId>"];
rewardedVideo.delegate = self;
[rewardedVideo loadRewardedVideo];
// ViewController

rewardedVideo = AMRRewardedVideo(forZoneId: "<zoneId>")
rewardedVideo.delegate = self
rewardedVideo.load()
For testing you can use following RewardedVideo Zone Id;
RewardedVideo Zone Id: @"2bdefd44-5269-4cbc-b93a-373b74a2f067"
There are 7 callback methods in AMRRewardedVideoDelegate protocol.
When didReceiveRewardedVideo callback method is called just call the showFromViewController
method to present rewarded video from a viewController.
- (void)didReceiveRewardedVideo:(AMRRewardedVideo *)rewardedVideo {
    [rewardedVideo showFromViewController:self];
}
func didReceive(_ rewardedVideo: AMRRewardedVideo!) {
    rewardedVideo.show(from: self)
}
If didFailToReceiveRewardedVideo callback method is called investigate
error
to adress the problem.
Important Attempting to load a new rewarded video from the
didFailToReceiveRewardedVideo
methods is strongly discouraged.
- (void)didFailToReceiveRewardedVideo:(AMRRewardedVideo *)rewardedVideo error:(AMRError *)error {
            NSLog(error.errorDescription);
        }
func didFail(toReceive rewardedVideo: AMRRewardedVideo!, error: AMRError!) {
print(error.errorDescription);
}didShowRewardedVideo callback method is called to inform the application that the received rewarded video is shown.
- (void)didShowRewardedVideo:(AMRRewardedVideo *)rewardedVideo {} func didShow(_ rewardedVideo: AMRRewardedVideo!) {} didFailToShowRewardedVideo callback method is called to inform the application that the received rewarded video failed to be shown.
This delegate expected to be called very rarely but if it is called you should either load another rewarded video or resume tasks.
- (void)didFailToShowRewardedVideo:(AMRRewardedVideo *)rewardedVideo error:(AMRError *)error {}
func didFail(toShow rewardedVideo: AMRRewardedVideo!, error: AMRError!) {}
New didClickRewardedVideo callback method when rewarded video clicked.
- (void)didClickRewardedVideo:(AMRRewardedVideo *)rewardedVideo {}
func didClick(_ rewardedVideo: AMRRewardedVideo!) {}
didCompleteRewardedVideo callback method is called to inform the application that the user completed watching the video to a certain point to get the reward. The video may have finished or keep playing after didCompleteRewardedVideo is called. Use this callback to reward the user.
Important Attempting to load a new rewarded video from the
didCompleteRewardedVideo
methods is strongly discouraged.
- (void)didCompleteRewardedVideo:(AMRRewardedVideo *)rewardedVideo {
            [player reward];
        }
func didComplete(_ rewardedVideo: AMRRewardedVideo!) {
            player.reward()
        }
didDismissRewardedVideo callback method is called to inform the application that the
rewarded video is closed by clicking cross button/back button. You can use this callback to resume paused tasks during
rewarded video presentation.
You can use didDismissRewardedVideo callback and reload a new rewarded video ad.
- (void)didDismissRewardedVideo:(AMRRewardedVideo *)rewardedVideo {
                    [animation resume];
                }
func didDismiss(_ rewardedVideo: AMRRewardedVideo!) {
                    animation.resume()
                }
You can use showFromViewController: method to present rewarded video from a viewController.
[rewardedVideo showFromViewController:self];rewardedVideo.show(from: self)You can use tag functionality for rewarded video zones. Tags will let you monitor the performance of the ads across different dimensions for the same zone. You can switch ads on and off for any specified tag whenever you want. Example usage is as follows;
[rewardedVideo showFromViewController:self withTag:@"game_start"];rewardedVideo.show(from: self, withTag: "game_start")Offerwall Ads
To create and show an offerwall ad first import AMRSDK to your UIViewController
file and declare an AMROfferWall property;
                // ViewController.h

                #import <AMRSDK/AMRSDK.h>

                @interface ViewController : UIViewController <AMROfferWallDelegate>

                @property(nonatomic, strong) AMROfferWall *fullScreen;

                @end
                // ViewController

                import AMRSDK

                class ViewController : UIViewController, AMROfferWallDelegate {

                var fullScreen: AMROfferWall!

                }
Initialize it with your Offerwall Zone Id and
set it's
delegate to an object (generally your viewController) which conforms to
AMROfferWallDelegate protocol.
                    // ViewController.m

                    fullScreen = [AMROfferWall offerWallForZoneId:@"<zoneId>"];
                    fullScreen.delegate = self;
                    [fullScreen loadOfferWall];
                    // ViewController

                    offerWall = AMROfferWall(forZoneId: "<zoneId>")
                    offerWall.delegate = self
                    offerWall.load()
For testing you can use following Offerwall Zone Id;
Offerwall Zone Id: @"1cadca08-33f9-4da7-969e-ef116d4e7d0e"
There are 5 callback methods in AMROfferWallDelegate protocol.
When didReceiveOfferWall callback method is called just call the showFromViewController
method to present offerwall from a viewController.
- (void)didReceiveOfferWall:(AMROfferWall *)offerwall {
                            [offerwall showFromViewController:self];
                        }
func didReceive(_ offerwall: AMROfferWall!) {
offerWall.show(from: self)
}If didFailToReceiveOfferWall callback method is called investigate error
to adress the problem.
- (void)didFailToReceiveOfferWall:(AMROfferWall *)offerwall error:(AMRError *)error {
                                NSLog(error.errorDescription);
                            }
func didFail(toReceive offerwall: AMROfferWall!, error: AMRError!) {
print(error.errorDescription)
}didShowOfferWall callback method is called to inform the application that the received offerwall is presented.
- (void)didShowOfferWall:(AMROfferWall *)offerwall {} func didShow(_ offerwall: AMROfferWall!) {} didFailToShowOfferWall callback method is called to inform the application that the received offerwall failed to be presented.
This delegate expected to be called very rarely but if it is called you should either load another offerwall or resume tasks.
- (void)didFailToShowOfferWall:(AMROfferWall *)offerwall error:(AMRError *)error {}
func didFail(toShow offerwall: AMROfferWall!, error: AMRError!) {}
didDismissOfferWall callback method is called to inform the application that the
offerwall is no longer present. You can use this callback to resume paused tasks during
offerwall presentation.
- (void)didDismissOfferWall:(AMROfferWall *)offerwall {} func didDismiss(_ offerwall: AMROfferWall!) {} Spend Virtual Currency
                                            // Spend Virtual Currency Callbacks - Optional
                                            [AMRSDK setVirtualCurrencyDelegate:self];
                                            [AMRSDK spendVirtualCurrency];

                                            - (void)didSpendVirtualCurrency:(NSString *)currency
                                                        amount:(NSNumber *)amount
                                                    networkName:(NSString *)networkName {}
                                        // Spend Virtual Currency Callbacks - Optional
                                        AMRSDK.setVirtualCurrencyDelegate(self)
                                        AMRSDK.spendVirtualCurrency()

                                        func didSpendVirtualCurrency(_ currency: String!, amount: NSNumber!, networkName: String!) {}
Extras
DFP/AdMob Mediation Integration
The AMR DFP Adapter lets publishers integrate Admost Mediation Router ads into applications with DFP or AdMob Mediation set as main ad mediation layer.
In order to show AMR ads in DFP/AdMob Mediation you should first follow dedicated steps of DFP or AdMob Mediation to set AMR as an ad mediation source.
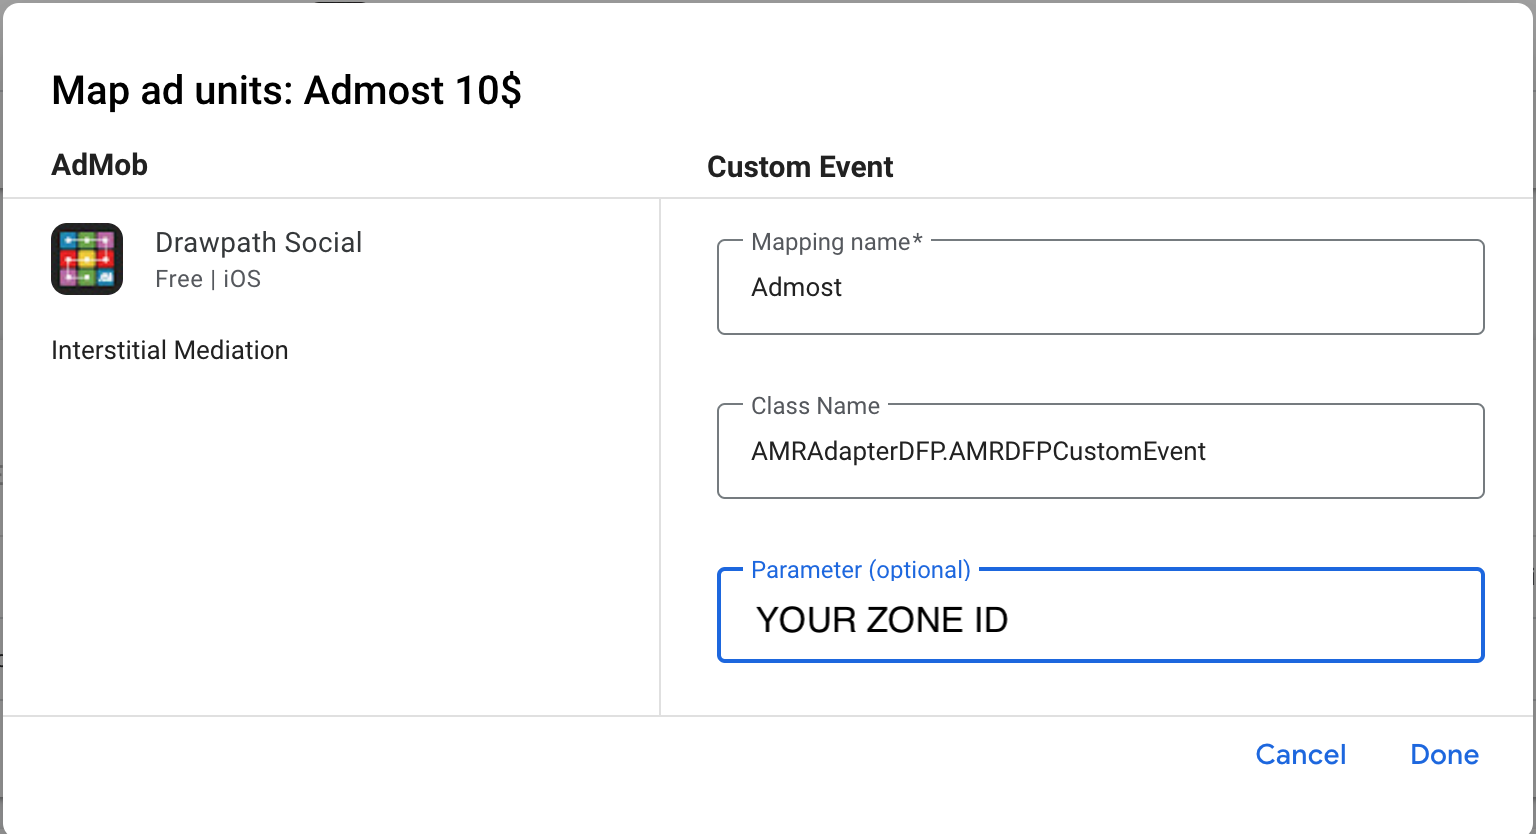
After adding AMR as an ad mediation source you should define class names for banner, interstitial, rewarded video and Rewarded Interstitial
ad custom events. Enter the AMRAdapterDFP.AMRDFPCustomEvent as
class name. You must pass your AMR zone Id to custom event via
Parameter field.
Include Admost DFP Adapter in your project after setup, if you are using CocoaPods add following line to your podfile and run the following command to install.
pod AMRAdapterDFP
$ pod install
Now you can show AMR banner, interstitial and rewarded video ads via DFP or AdMob Mediation.
You can check DFP banner and interstitial example in demo project; AMRDemo/DFPCustomEvents/DFPCustomEventsViewController.m
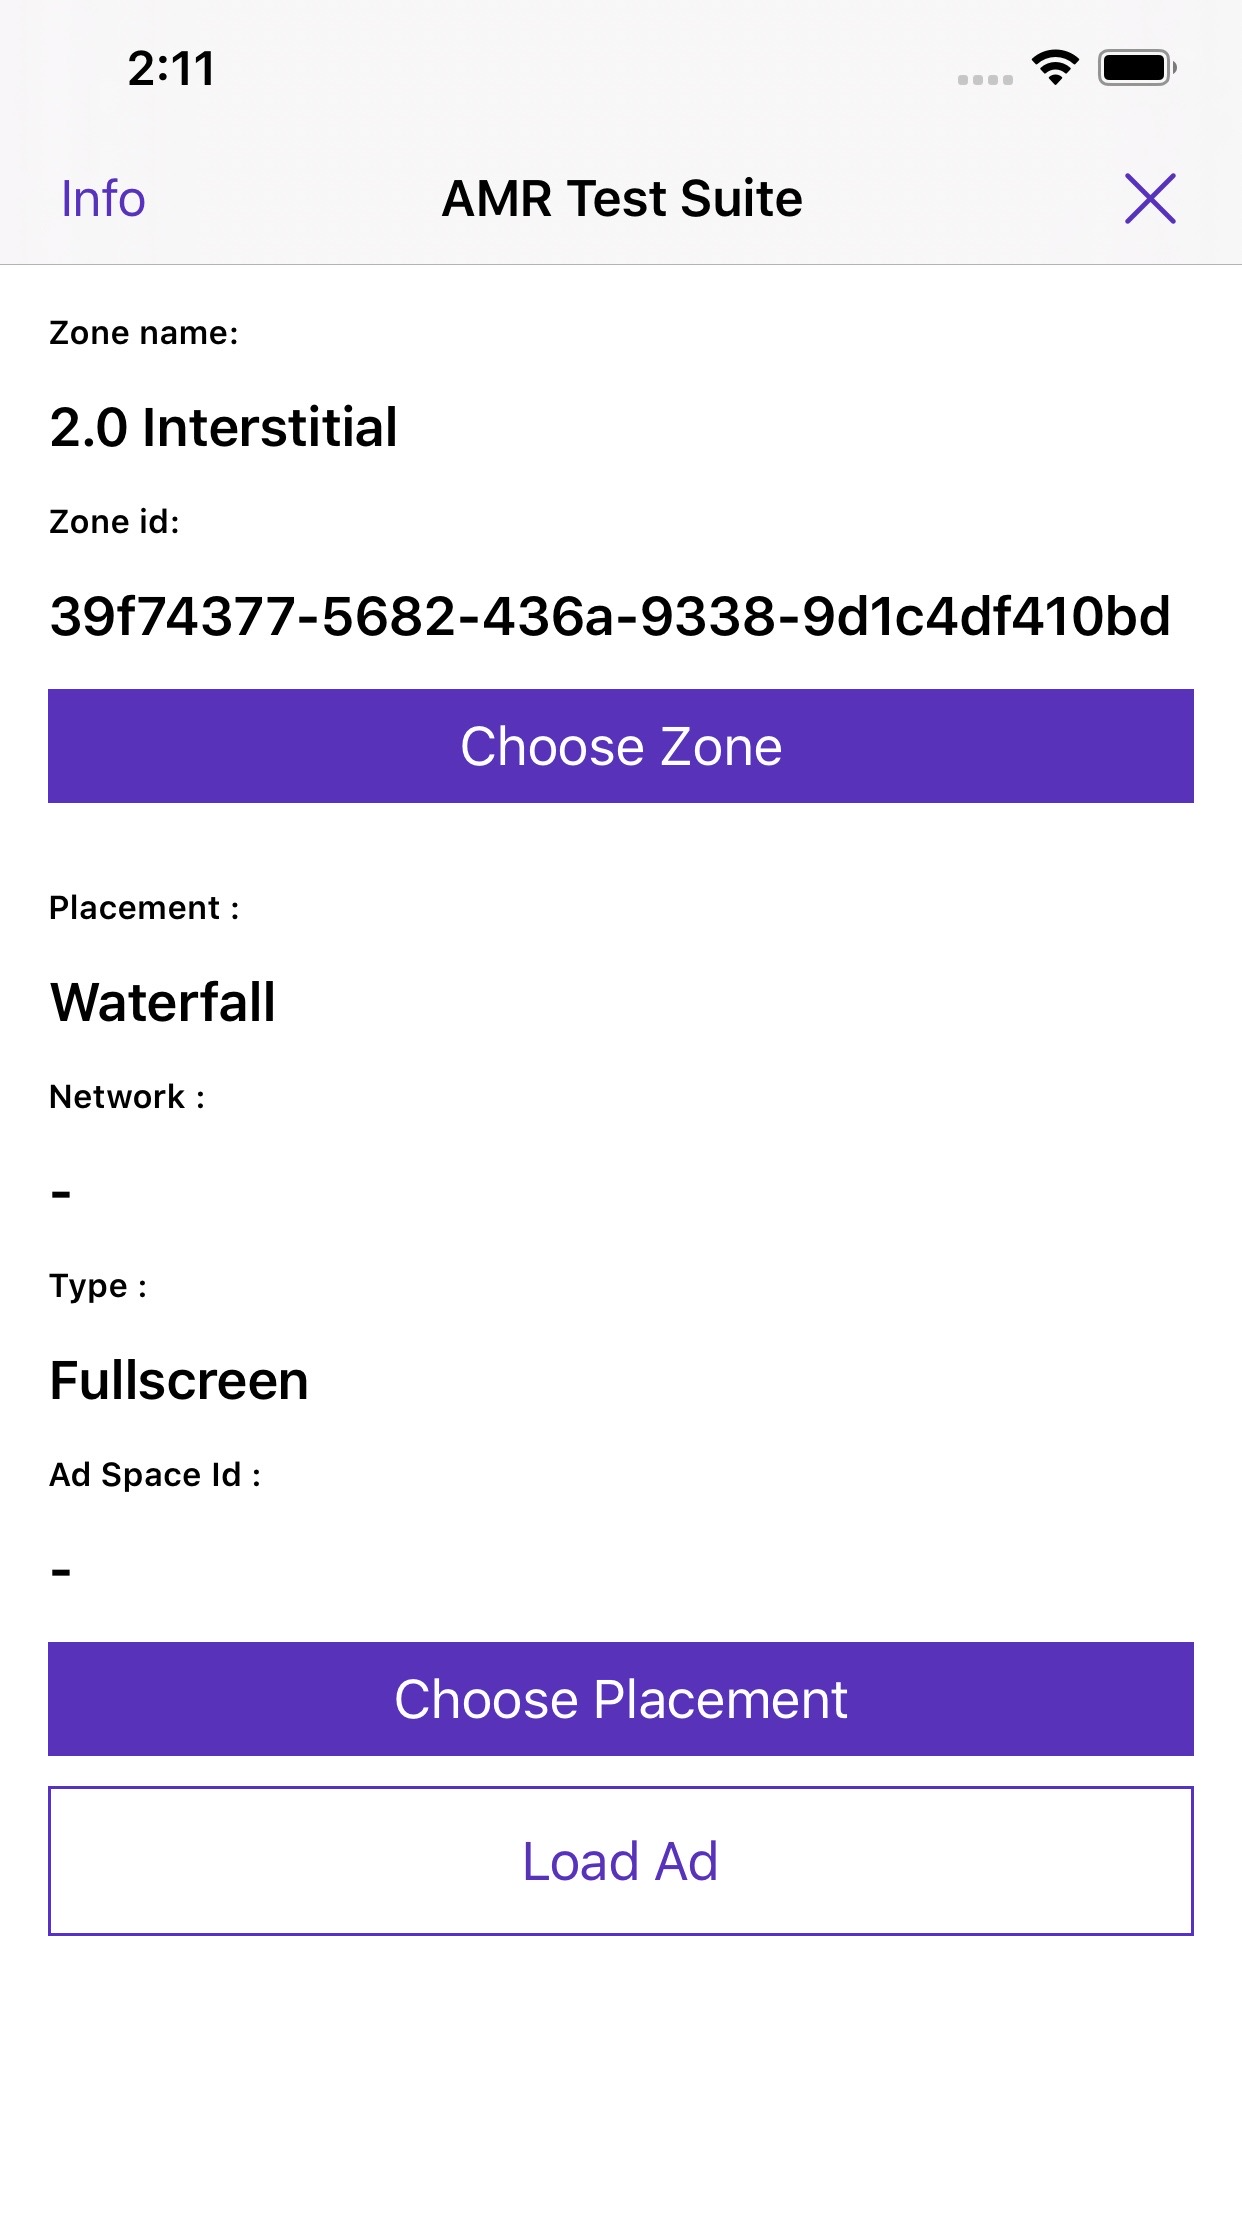
Test Suite
You can use Test Suite to test your ad networks with your zone ids.
You must be a Tester to show Test Suite on devices.
To use Test Suite in your application, you can use one of the following codes;
[AMRSDK startTestSuiteWithAppId:@"<appId>"];
[AMRSDK startTestSuiteWithZones:@[<zoneIds>]];
AMRSDK.startTestSuite(withAppId:"<appId>")
AMRSDK.startTestSuite(withZones:[<zoneIds>]];
In App Purchase Tracking
The following method is used to track purchases with receipt validation:
[AMRSDK trackIAP:@"<transactionId>"
currencyCode:@"<currencyCode>"
amount:<amount>
tags:@[tags]];
AMRSDK.trackIAP("<transactionId>",
currencyCode:"<currencyCode>",
amount:<amount>,
tags:[tags])
Explanation of Parameters:
- transactionId – Transaction identifier of SKPaymentTransaction.
- currencyCode – Currency code of transaction.
- amount – Amount of transaction.
- tags – Distinction value for in-app purchase that used in multiple purposes.
Example code for in app purchase tracking:
SKProduct *product = ...;
NSLocale *priceLocale = product.priceLocale;
NSString *currencyCode = [priceLocale objectForKey:NSLocaleCurrencyCode];

[AMRSDK trackIAP:transaction.transactionIdentifier
                 currencyCode:currencyCode
                 amount:[product.price doubleValue]
                 tags:@[tags]];
let product: SKProduct = ...;
let currencyCode = product.priceLocale.currencyCode

AMRSDK.trackIAP(transaction.transactionIdentifier,
                currencyCode:currencyCode,
                amount:product.price
                tags:[tags])
Preloading Banners
You can use cacheBanner method to cache your banners before showing them.
In order to cache banners use following code;
AMRBanner* banner = [AMRBanner bannerForZoneId:@"<zoneId>"];
banner.bannerWidth = 320;
[banner cacheBanner];
let banner = AMRBanner.init(forZoneId:"<zoneId>")
banner.bannerWidth = 320
banner.cacheBanner()
Setting Application User Id
You can use the following method to set application specific user id in Admost Analytics for enhanced tracking of your users. You should to call this method before initialization.
[AMRSDK setUserId:@"<applicationUserId>"];
AMRSDK.setUserId("<applicationUserId>")
Adjust Integration
Follow the official ADJUST documents to integrate AdjustSDK in to your app.
#import <AMRSDK/AMRSDK.h>
#import <AdjustSdk/Adjust.h>

@interface AppDelegate () <AdjustDelegate> @end

 - (BOOL)application:(UIApplication *)application
didFinishLaunchingWithOptions:(NSDictionary *)launchOptions {

    [AMRSDK startWithAppId:@"<appId>"];
    .
    .

    // Adjust Integration

    // Replace <yourAdjustAppToken> with your Adjust app token.
    NSString *yourAppToken = @"<yourAdjustAppToken>"

    // Replace environment from ADJEnvironmentSandbox to ADJEnvironmentProduction before publishing.
    NSString *environment = ADJEnvironmentSandbox;

    ADJConfig *adjustConfig = [ADJConfig configWithAppToken:yourAppToken
    environment:environment];

    [adjustConfig setDelegate:self];
    [Adjust appDidLaunch:adjustConfig];
    .
    .

    return YES;
}
import AMRSDK
import AdjustSdk

class AppDelegate: UIResponder, UIApplicationDelegate, AdjustDelegate {

func application(_ application: UIApplication, didFinishLaunchingWithOptions launchOptions:
[UIApplication.LaunchOptionsKey: Any]?) -> Bool {

    AMRSDK.start(withAppId:"<appId>")
    .
    .

    // Adjust Integration

    // Replace <yourAdjustAppToken> with your Adjust app token.
    let yourAppToken = "<yourAdjustAppToken>"

    // Replace environment from ADJEnvironmentSandbox to ADJEnvironmentProduction before publishing.
    let environment = ADJEnvironmentSandbox

    let adjustConfig = ADJConfig(appToken: yourAppToken, environment: environment)
    adjustConfig?.delegate = self

    Adjust.appDidLaunch(adjustConfig)
    .
    .

    return true
}
Important
Replace environment from <ADJEnvironmentSandbox> to <ADJEnvironmentProduction>
before publishing.
Important
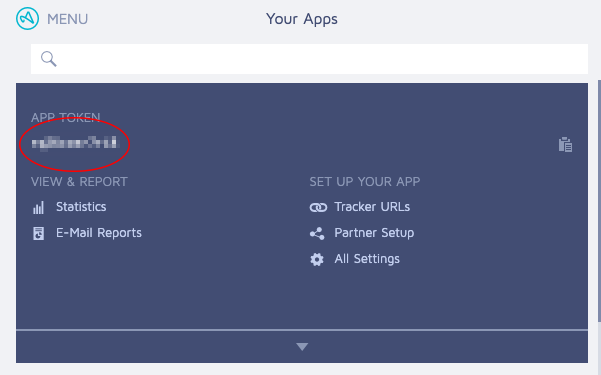
Replace <yourAdjustAppToken> with your own Adjust app token. You can find this in your Adjust dashboard.
Your Adjust app token can be found on Adjust Dashboard -> Apps -> App Detail.
AppsFlyer Integration
Follow the official APPSFLYER documents to integrate AppsFlyerSDK in to your app.
Server to Server Callbacks
For rewarded video ads, you can use Server to Server Callbacks for rewarding users after successful completion of video ads. Please consult your business contact person for enabling it and setting required parameters like callback URL, request verification token and method.
To use this feature, only requirement on application side is setting your application user id as described here. You may also add new custom parameters to the callback URL by setting custom data to the rewarded video object AMRRewardedVideo as shown in the sample code below. This method has to be called before showing ad.
rewardedVideo.customData = @{
                            @"ip": @"127.0.0.1",
                            @"os": @"12.0.1"
                            };
rewardedVideo.customData = [
                            "ip": "127.0.0.1",
                            "os": "12.0.1"
                            ]
You may also set ssvServerKey parameter to decide SSV Server.
rewardedVideo.ssvServerKey = @"test_server";
rewardedVideo.ssvServerKey = "test_server"
Privacy Consent Required
You can optionally use isPrivacyConsentRequired method to obtain the user is in a GDPR or CCPA required country.
[AMRSDK isPrivacyConsentRequired:^(AMRPrivacyConsentStatus consentStatus) {}];
AMRSDK.isPrivacyConsentRequired { (consentStatus) in}
Apple App Privacy
Starting December 8, 2020, Apple has announced a privacy disclosure for the App Store, You must define which data are collected by your apps and any SDKs you have integrated. To improve the performance of AdMost, the AMRSDK may collect following information from your apps:
- User ID – If you are using
setUserIdmethod to identify users with your custom app user ID, you will need to select 'User ID' - Purchases – If you are using in app purchase trackings methods, you will need to select 'Purchases'
- Coarse Location – To estimate the general location of a device
- Product Interaction – Analytics purposes
- Advertising Data – Analytics purposes
Remote Config
Admost Remote config is a feature for defining and updating server side parameters from the Admost dashboard. You can define the parameters in long, double, boolean and string types. Example usage is as follows;
/* it is required to call value functions after Admost initialization
    otherwise default value will be used. */
[AMRSDK fetchRemoteConfigWithCompletion:^(AMRError * _Nonnull) {
    [AMRSDK getConfigForKey:@""].stringValue;
    [AMRSDK getConfigForKey:@""].numberValue;
    [AMRSDK getConfigForKey:@""].boolValue;
 }];
/* it is required to call value functions after Admost initialization
    otherwise default value will be used. */
AMRSDK.fetchRemoteConfigWithCompletion(completionHandler:(AMRError) -> Void) {
    AMRSDK.getConfigForKey("").stringValue;
    AMRSDK.getConfigForKey("").numberValue;
    AMRSDK.getConfigForKey("").boolValue;
}
You can also run A/B tests for remote config parameters with or without bundling other test parameters. You do not have to do anything to run or join these tests on client side, random percentile targeting feature of the sdk will handle it itself. You can define these tests and target your audiences from the dashboard's A/B test menu.
CMP(Consent Management Platform) Integration
Starting January 16, 2024 Publishers and developers using Google AdSense, Ad Manager, or AdMob will be required to use a Consent Management Platform (CMP) that has been certified by Google and has integrated with the IAB's Transparency and Consent Framework (TCF) when serving ads to users in the European Economic Area or the UK. You can also review the official documentation to integrate it into your app.
As Admost, we have integration with Google’s CMP tool User Messaging Platform (UMP). As a publisher, if you chose to continue with the UMP, you have to be sure about the following steps;
- Add UMP SDK into your app and complete the integration according to the UMP integration documentation.
- Create a proper GDPR message for your app on the UMP dashboard.
- Select all active ad networks and "Admost" as Vendor on the UMP dashboard.
- Check Auto UMP Detection checkbox on Admost dashboard application edit popup.
Note Admost SDK can be init before or after the consent message.
Important Advertising request should not be made without canRequestAds set.
Example usage is as follows;
#include <UserMessagingPlatform/UserMessagingPlatform.h>import UserMessagingPlatform
__weak __typeof__(self) weakSelf = self;

UMPRequestParameters *parameters = [[UMPRequestParameters alloc] init];
parameters.tagForUnderAgeOfConsent = NO;

[UMPConsentInformation.sharedInstance requestConsentInfoUpdateWithParameters:parameters completionHandler:^(NSError *_Nullable requestConsentError) {
    if (requestConsentError) {
        NSLog(@"Error: %@", requestConsentError.localizedDescription);
        return;
    }

    __strong __typeof__(self) strongSelf = weakSelf;
    if (!strongSelf) {
        return;
    }

    [UMPConsentForm loadAndPresentIfRequiredFromViewController:strongSelf
        completionHandler:^(NSError *loadAndPresentError) {
            if (loadAndPresentError) {
            NSLog(@"Error: %@", loadAndPresentError.localizedDescription);
            return;
            }
            // Consent has been gathered.
        }];

    [AMRSDK canRequestAds: [UMPConsentInformation sharedInstance].canRequestAds];
}];
let parameters = UMPRequestParameters()
parameters.tagForUnderAgeOfConsent = false

UMPConsentInformation.sharedInstance.requestConsentInfoUpdate(with: parameters) { requestConsentError in
    if (requestConsentError != nil) {
        print("Error: \(requestConsentError)")
        return
    }

    UMPConsentForm.loadAndPresentIfRequired(from: self) { loadAndPresentError in
        if (loadAndPresentError != nil) {
            print("Error: \(loadAndPresentError)")
            return
        }
        // Consent has been gathered.
    }

    AMRSDK.canRequestAds(UMPConsentInformation.sharedInstance.canRequestAds)
}