Prerequisites
- Admost account Admost Mediation Dashboard.
- Unity 5.x or later.
- New Unity Jar Resolver package. (Recommended version: v1.2.124 and upwards )
- Xcode 12.5 and iOS 9 or later for iOS.
- Cocoapods for iOS.
Setup
Sample Code
You can optionally download sample code: Download
Import Unity Packages
- Remove Assets/AMR and Plugins/Android/amr_definition folders if present.
- Select necessary network adapters and download package.
- Import package to your Unity project.
Please refer to following table for required and optional packages for your target.
Android Setup Notes
- Gradle Custom Template is strongly recommended to prevent library conflicts. (In Unity Editor: Player Settings > Publishing Settings > check Custom Main Manifest, Custom Main Gradle Template, and Custom Gradle Properties Template. ).
- You need to use Android Resolver. Unity Editor > Android Resolver > Settings, please enable AndroidX and Jetifier by adding the lines below to Custom Gradle Properties Template file.
- Android Resolver sould be run. (Unity Editor > Assets > Play Services Resolver > Android Resolver > click Resolve or Force Resolve.
- Recommended Gradle Build Tools Plugin version is 3.2.0 (e.g: in mainTemplate.gradle file, check the line of classpath 'com.android.tools.build:gradle:3.2.0'). Other versions of 3.x.x and upwards could also be used. Usage of 2.x.x is valid but not tested well.
- If you face with gradle related build errors, please check it: Gradle Build Tools Plugin version and Gradle version should be compatible version mapping
- You may need to add google() repository to the repositories { } tag in mainTemplate.gradle file if not present.
android.useAndroidX=true
android.enableJetifier=true
-
AppLovin Configuration
If you are integrating AppLovin in your application, you have to edit applovin.sdk.key value inside
Plugins/Android/AMR.plugin/AndroidManifest.xml -
AdMob Configuration for Play Services Ads 17.0.0 or higher
If you are using AdMob(com.google.android.gms:play-services-ads) with version 17.0.0 and higher, you must add your AdMob App ID to your Android Manifest file.
<manifest>
  <application>
	  <!-- Sample AdMob App ID: ca-app-pub-0000000000000000~0000000000 -->
	  <meta-data
		  android:name="com.google.android.gms.ads.APPLICATION_ID"
		  android:value="[ADMOB_APP_ID]"/>
  </application>
</manifest>
Multidex Configuration
You probably want to enable Multidex for your application since even the usage of several libraries extend the method limitation of Android.
More info related to Multidex: Android docs
In order to make your application MultiDex, here is the steps:
- Open mainTemplate.gradle file and add multiDexEnabled true and multidex library as below.
android { defaultConfig { .... multiDexEnabled true .... } // NOTE: If your app's minimum API level is greater than 20, you can skip the remaining Multidex related configuration. // If you don't enabled AndroidX for your app, add the multidex library like below: dependencies { .... implementation 'com.android.support:multidex:1.0.3' .... } // If you enabled AndroidX for your app use the below dependencies { .... implementation 'androidx.multidex:multidex:2.0.1' .... } - Open AndroidManifest.xml file and add the android:name tag as below:
<?xml version="1.0" encoding="utf-8"?>
<manifest xmlns:android="http://schemas.android.com/apk/res/android"
    package="com.amr.definition">
    <application
        ...
            //If you don't use AndroidX packages
            android:name="android.support.multidex.MultiDexApplication" >

            //If you use AndroidX packages
            android:name="androidx.multidex.MultiDexApplication" >
        ...
        </application>
</manifest>
iOS Setup Notes
Xcode Setup
Add following SKAdNetwork code to your Info.plist file:
Add following lines to your plist file.
<key>NSAppTransportSecurity</key>
<dict>
    <key>NSExceptionDomains</key>
    <dict>
        <key>admost.com</key>
        <dict>
            <key>NSExceptionAllowsInsecureHTTPLoads</key>
            <true/>
            <key>NSIncludesSubdomains</key>
            <true/>
        </dict>
    </dict>
</dict>
<key>NSCalendarsUsageDescription</key>
<string>Some ad content may access calendar</string>Important If you are using AdMob you must add your AdMob App ID to your plist file with GADApplicationIdentifier key as shown below.
(Replace ca-app-pub-XXXXXXXXXXXXXXXX~XXXXXXXXXX with your own App ID)
<key>GADApplicationIdentifier</key>
<string>ca-app-pub-XXXXXXXXXXXXXXXX~XXXXXXXXXX</string>
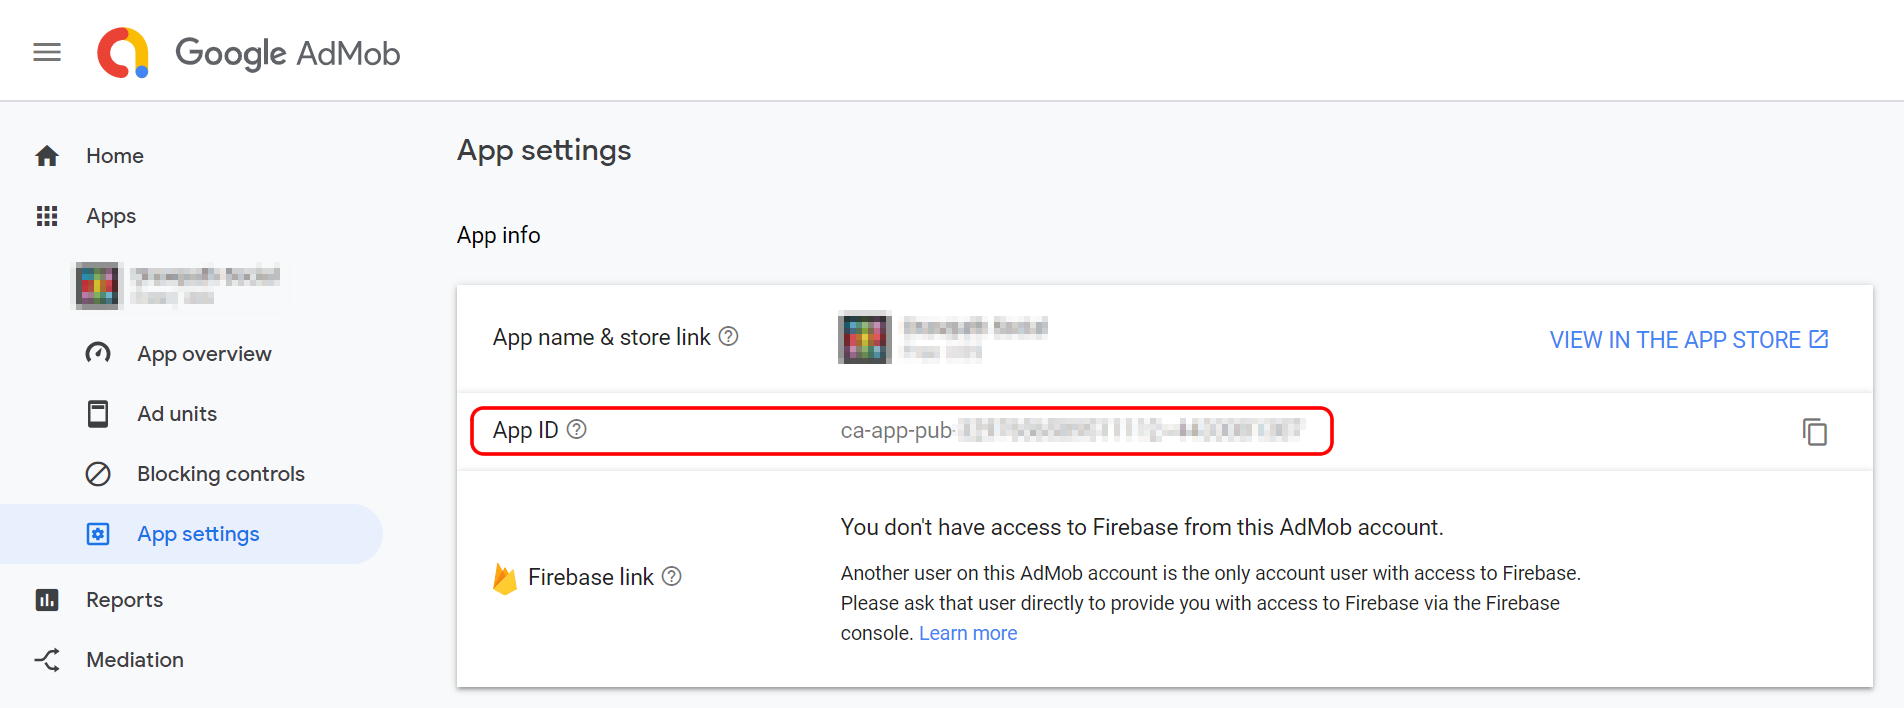
Your App ID can be found on AdMob dashboard -> Apps -> App settings -> App info.
Important For Unity 2020 and later versions, you should also add following code to your podfile.
use_frameworks! :linkage => :static
Important If you are using AppLovin you must add AppLovin SDK Key to your plist file with AppLovinSdkKey key as shown below.
(Replace XXXXXXXXXXXXXXX with your own AppLovin SDK Key)
<key>AppLovinSdkKey</key>
<string>XXXXXXXXXXXXXXX</string>
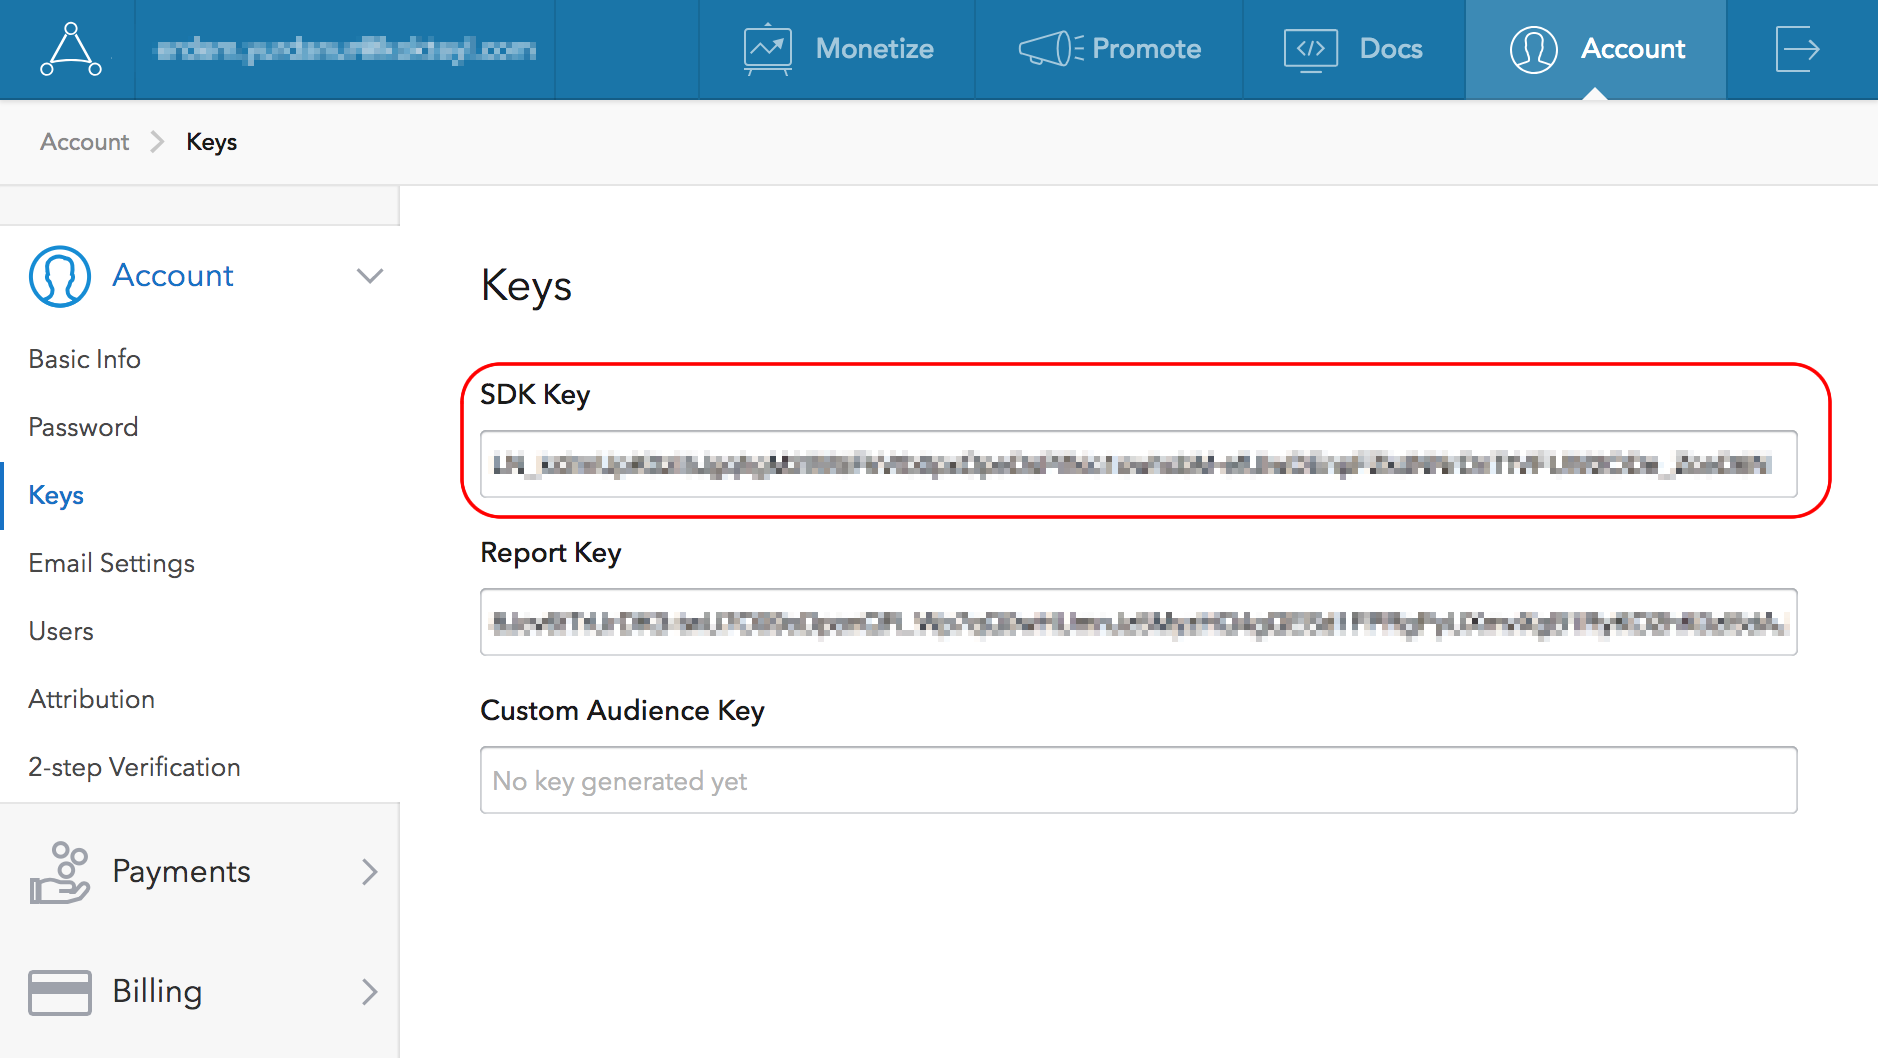
Your AppLovin SDK Key can be found on AppLovin Dashboard -> Account -> Keys.
Important If you are using Pollfish you must update and add Pollfish Policy to your privacy policy file.
New iOS 14.5
Starting with iOS 14.5, apps will be required to ask users for permission to access IDFA. In order to ask for this permission and display the App Tracking Transparency authorization request for accessing the IDFA, you will need to add NSUserTrackingUsageDescription key to Info.plist file.
For detailed information. iOS 14.5
     <key>NSUserTrackingUsageDescription</key>
     <string>Your awesome message to encourage user to give permission to access IDFA</string>
Usage
Initialization
To initialize Admost Mediation SDK, create and configure instance of an AMRSdkConfig and start the SDK with your config object.
void Start()
{
    AMR.AMRSdkConfig config = new AMR.AMRSdkConfig();
    config.ApplicationIdAndroid = "<Your Android App Id>";
    config.ApplicationIdIOS = "<Your IOS App Id>";

    config.BannerIdAndroid = "<Your Android Banner Zone Id>";
    config.BannerIdIOS = "<Your IOS Banner Zone Id>";

    config.InterstitialIdAndroid = "<Your Android Interstitial Zone Id>";
    config.InterstitialIdIOS = "<Your IOS Interstitial Zone Id>";

    config.RewardedVideoIdAndroid = "<Your Android Video Zone Id>";
    config.RewardedVideoIdIOS = "<Your IOS Video Zone Id>";

    config.OfferWallIdAndroid = "<Your Android Offerwall Zone Id>";
    config.OfferWallIdIOS = "<Your IOS Offerwall Zone Id>";

    AMR.AMRSDK.startWithConfig(config);
}
To listen the initialization callbacks of startWithConfig command, you can use the following method instead of the previous one;
void Start()
{
    AMR.AMRSDK.startWithConfig(config, OnSDKDidInitialize);
}

void OnSDKDidInitialize(bool success, String error) { }
Setup Privacy (GDPR, CCPA and COPPA)
Once you have collected the user’s consent, you can pass it onto the SDK using the init configuration parameters shown below.
//Privacy COMPLIANCE
config.UserConsent = "1";
config.SubjectToGDPR = "1";
config.SubjectToCCPA = "1";
config.IsUserChild = "1";
UserConsent has a boolean parameter. If you have the user’s consent, set it "1". If you do not have the user's consent, set it "0".
SubjectToGDPR has a boolean parameter. If you know the user is subject to GDPR, set it "1". If you know the user is not subject to GDPR, set it "0".
If you don’t pass the user’s consent or subjectToGDPR to the SDK, the rules described in Privacy have been applied.
SubjectToCCPA has a boolean parameter. If you know the user is subject to CCPA, set it "1". If you know the user is not subject to CCPA, set it "0".
If you don’t pass the user’s consent or subjectToCCPA to the SDK, the rules described in Privacy have been applied.
IsUserChild has a string parameter. If you want to show age-restricted ads, set it "1", otherwise no need to set it.
Huawei App Gallery Configuration
IsHuaweiApp has a boolean parameter. If you want to submit your app to the Huawei AppGallery, set it true. For Huawei AppGallery applications, we are using OAID(Open Advertiser ID) instead of GAID(Google Advertising ID) for attribution purposes, so we need to know if the application is Huawei AppGallery application. You can use this config parameter during initialization, otherwise AdMost sdk will try to get GAID and fail.
It is recommended to create a new application and placement definitions on Admost dashboard instead of using existing one for Huawei App Gallery. Using HuaweiAds in a Huawei App Gallery application is also recommended.
Banner Ads
To create and show a banner ad run the following code
AMR.AMRSDK.loadBanner(AMR.Enums.AMRSDKBannerPosition.BannerPositionTop, true);
If you want to show a banner manually after it has loaded, pass false as the second parameter of loadBanner method and wait for the OnBannerReady callback. Then call the following method to show banner.
AMR.AMRSDK.showBanner();
Call hideBanner method to hide the banner;
AMR.AMRSDK.hideBanner();
You can subscribe OnBannerReady, OnBannerFail or OnBannerClick callback functions to catch banner events.
// Banner Callbacks - Optional
AMR.AMRSDK.setOnBannerReady(OnBannerReady);
AMR.AMRSDK.setOnBannerFail(OnBannerFail);
AMR.AMRSDK.setOnBannerClick(OnBannerClick);
AMR.AMRSDK.setOnBannerImpression(OnBannerImpression);

public void OnBannerReady(string networkName, double ecpm) {}
public void OnBannerFail(string error) {}
public void OnBannerClick(string networkName) {}
public void OnBannerImpression(AMR.AMRAd ad) {}
Interstitial Ads
To load an Interstitial ad run the following code;
AMR.AMRSDK.loadInterstitial();
To show a loaded interstitial run the following code;
if (AMR.AMRSDK.isInterstitialReady())
	AMR.AMRSDK.showInterstitial();
As an alternative, if you want to send tag parameter, run the following code;
if (AMR.AMRSDK.isInterstitialReady())
	AMR.AMRSDK.showInterstitial("MyTag");
You can subscribe to 7 callback functions OnInterstitialReady, OnInterstitialFail, OnInterstitialShow, OnInterstitialImpression, OnInterstitialClick and OnInterstitialDismiss to catch interstitial events.
void Start()
{
    // Interstitial Callbacks - Optional


    AMR.AMRSDK.setOnInterstitialReady(OnInterstitialReady);
    AMR.AMRSDK.setOnInterstitialFail(OnInterstitialFail);
    AMR.AMRSDK.setOnInterstitialFailToShow(OnInterstitialFailToShow);
    AMR.AMRSDK.setOnInterstitialShow(OnInterstitialShow);
    AMR.AMRSDK.setOnInterstitialImpression(OnInterstitialImpression);
    AMR.AMRSDK.setOnInterstitialClick(OnInterstitialClick);
    AMR.AMRSDK.setOnInterstitialDismiss(OnInterstitialDismiss);
    AMR.AMRSDK.setOnInterstitialStatusChange(OnInterstitialStatusChange);
}

// It indicates that the interstitial ad is loaded and ready to show.
public void OnInterstitialReady(string networkName, double ecpm) {}

// It indicates that the interstitial ad received no-fill response from all of its placements. Therefore, the ad can not be shown. You may choose to try loading it again.
public void OnInterstitialFail(string errorMessage) {}

// It indicates that the interstitial ad is failed to show.
public void OnInterstitialFailToShow() {}

// It indicates that the loaded interstitial ad is shown to the user.
public void OnInterstitialShow() {}

// It indicates that the impression counted by the ad network and ad revenue paid.
public void OnInterstitialImpression(AMR.AMRAd ad) {}

// It indicates that the interstitial ad is clicked.
public void OnInterstitialClick(string networkName) {}

// It indicates that the interstitial ad is closed by clicking cross button/back button
public void OnInterstitialDismiss() {}

// It indicates that the interstitial ad status changed. (ex: frequency capping finished)
public void OnInterstitialStatusChange(int status) {}
Reload Ad
You can subscribe to OnInterstitialDismiss callback and reload a new interstitial ad.
void Start()
{
    AMR.AMRSDK.setOnInterstitialDismiss(OnInterstitialDismiss);
}

public void OnInterstitialDismiss()
{
    AMR.AMRSDK.loadInterstitial();
}
Rewarded Ads
Rewarded video ads' integration is pretty similar to Interstitial ads with 1 additional event rewardedVideoComplete to reward the user.
To load an rewarded video ad, run the following code;
AMR.AMRSDK.loadRewardedVideo();
To show an rewarded video ad, run the following code;
if (AMR.AMRSDK.isRewardedVideoReady())
	AMR.AMRSDK.showRewardedVideo();
As an alternative, if you want to send tag parameter, run the following code;
if (AMR.AMRSDK.isRewardedVideoReady())
	AMR.AMRSDK.showRewardedVideo("MyTag");
You can subscribe to 9 callback functions OnRewardedVideoReady, OnRewardedVideoFail, OnRewardedVideoShow, OnRewardedVideoClick, OnVideoDismiss and OnVideoComplete to catch rewarded video events.
void Start()
{
    // Rewarded Video Callbacks - Optional
    AMR.AMRSDK.setOnRewardedVideoReady(OnVideoReady);
    AMR.AMRSDK.setOnRewardedVideoFail(OnVideoFail);
    AMR.AMRSDK.setOnRewardedVideoFailToShow(OnVideoFailToShow);
    AMR.AMRSDK.setOnRewardedVideoShow(OnVideoShow);
    AMR.AMRSDK.setOnRewardedVideoImpression(OnVideoImpression);
    AMR.AMRSDK.setOnRewardedVideoClick(OnVideoClick);
    AMR.AMRSDK.setOnRewardedVideoDismiss(OnVideoDismiss);
    AMR.AMRSDK.setOnRewardedVideoComplete(OnVideoComplete);
    AMR.AMRSDK.setOnRewardedVideoStatusChange(OnVideoStatusChange);
}

// It indicates that the rewarded video ad is loaded and ready to show.
public void OnVideoReady(string networkName, double ecpm) {}

// It indicates that the rewarded video ad received no-fill response from all of its placements.
//Therefore, the ad can not be shown. You may choose to try loading it again.
public void OnVideoFail(string errorMessage) {}

// It indicates that the loaded rewarded video ad is shown to the user.(Note: It does not mean that the user deserves a reward)
// It is immediately called after the loaded ad is shown to the user using AMR.AMRSDK.showRewardedVideo()
public void OnVideoShow() {}

// It indicates that the rewarded video ad is failed to show.
public void OnVideoFailToShow() {}

// It indicates that the impression has been counted by the ad network and ad revenue got paid.
public void OnVideoImpression(AMR.AMRAd ad) {}

// It indicates that the rewarded video ad is clicked.
public void OnVideoClick(string networkName) {}

// It indicates that the rewarded video ad is closed by clicking cross button/back button.
// It does not mean that the user deserves to receive a reward. You need to check whether OnVideoComplete callback is called or not.
public void OnVideoDismiss() {}

// It indicates that the user deserves to receive a reward. You may need to store this information in a variable and give a reward
// to the user after OnVideoDismiss() callback is called by showing some animations for instance.
// Note: If OnVideoComplete callback is called for the ad, it is always called before OnVideoDismiss() callback.
public void OnVideoComplete() {}

// It indicates that rewarded video status changed. (ex: frequency capping finished)
public void OnVideoStatusChange(int status) {}
Reload Ad
You can subscribe to OnRewardedVideoDismiss callback and reload a new rewarded video ad.
void Start()
{
    AMR.AMRSDK.setOnRewardedVideoDismiss(OnVideoDismiss);
}

public void OnVideoDismiss()
{
    AMR.AMRSDK.loadRewardedVideo();
}
Offerwall Ads
To load an offerwall ad, run the following code;
AMR.AMRSDK.loadOfferWall();
To show an offerwall ad, run the following code;
if (AMR.AMRSDK.isOfferWallReady())
	AMR.AMRSDK.showOfferWall();
As an alternative, if you want to send tag parameter, run the following code;
if (AMR.AMRSDK.isOfferWallReady())
	AMR.AMRSDK.showOfferWall("MyTag");
You can subscribe to 3 callback functions OnOfferWallReady, OnOfferWallFail and OnOfferWallDismiss to catch offerwall events.
void Start()
{
    // Offerwall Callbacks - Optional
    AMR.AMRSDK.setOnOfferWallReady(OnOfferWallReady);
    AMR.AMRSDK.setOnOfferWallFail(OnOfferWallFail);
    AMR.AMRSDK.setOnOfferWallDismiss(OnOfferWallDismiss);
}

public void OnOfferWallReady(string networkName, double ecpm) {}
public void OnOfferWallFail(string error) {}
public void OnOfferWallDismiss() {}
Spend Virtual Currency
void Start()
{
    // Spend Virtual Currency Callbacks - Optional
    AMR.AMRSDK.setOnDidSpendVirtualCurrency(OnVirtualCurrencyDidSpend);
}

public void OnVirtualCurrencyDidSpend(string networkName, string currency, double amount) {}
Extras
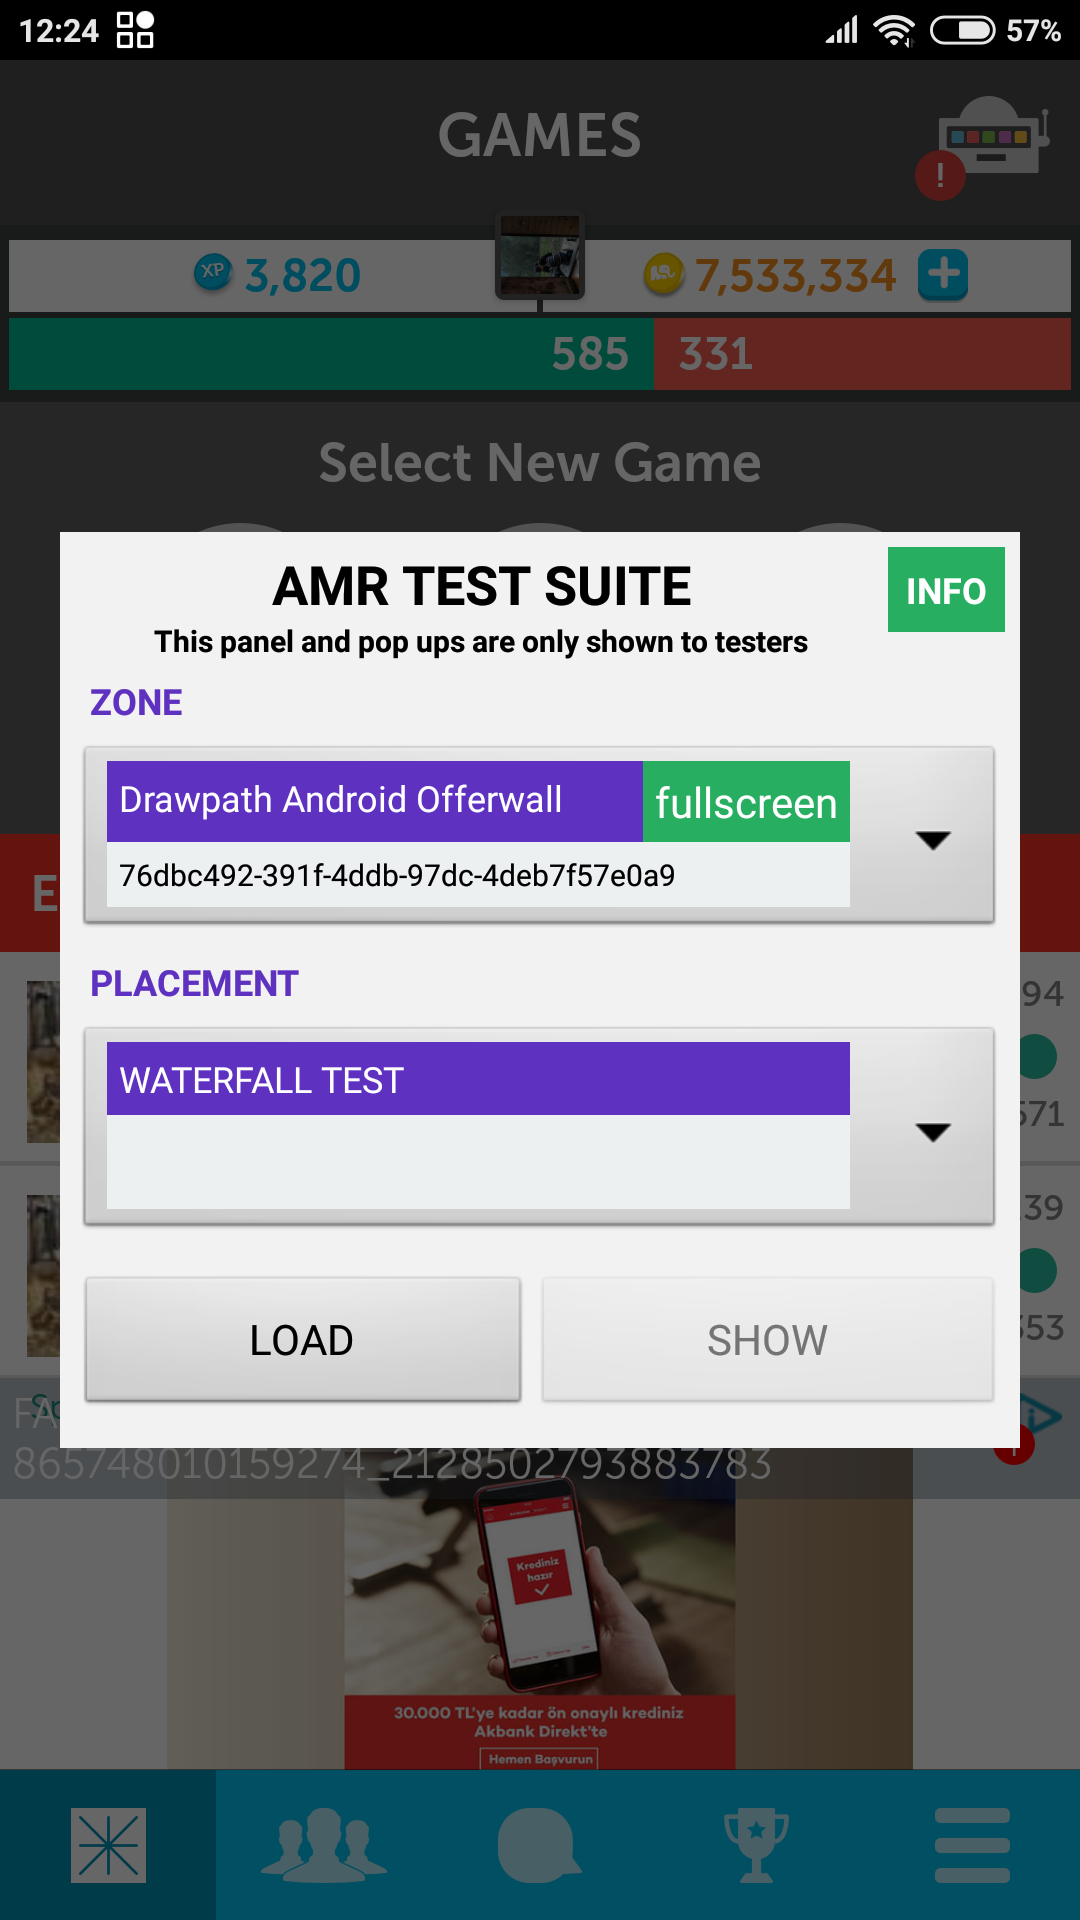
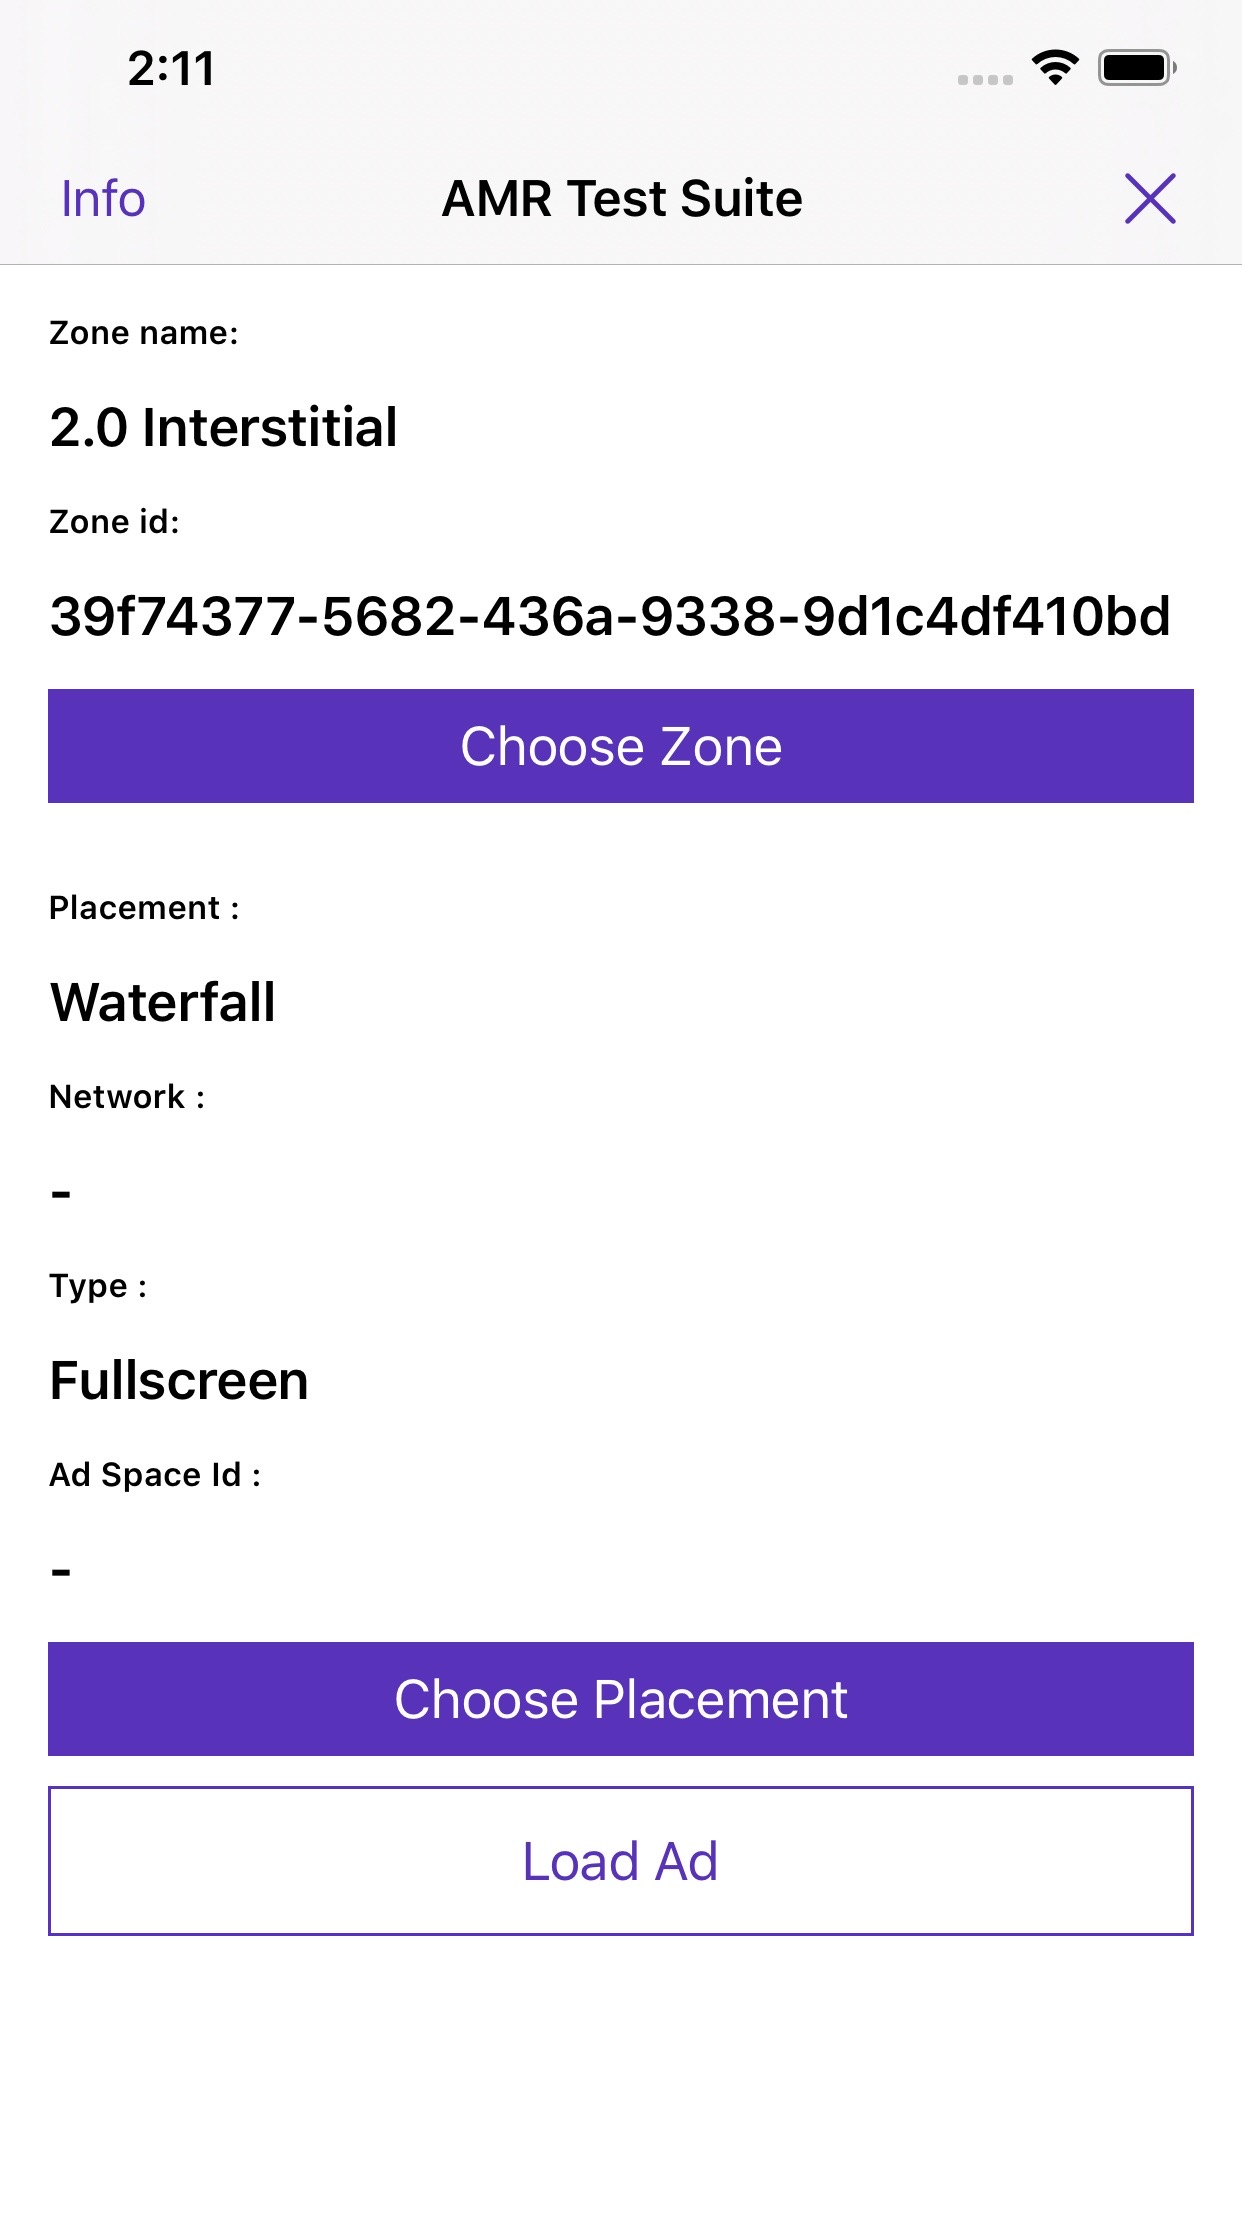
Test Suite
You can use Test Suite to test your ad networks with your zone ids.
To use Test Suite in your application, you can use following code;
    // Call method with tested zone ids
    #if UNITY_IPHONE
    AMR.AMRSDK.startTestSuite(new string[] {"IOS_ZONE_ID","ANOTHER_IOS_ZONE_ID"});
    #endif
    #if UNITY_ANDROID
    AMR.AMRSDK.startTestSuite(new string[] {"ANDROID_ZONE_ID","ANOTHER_ANDROID_ZONE_ID"});
    #endif
Android
iOS
In App Purchase Tracking
The following call is used to track purchases with receipt validation:
                    //Product refers UnityEngine.Purchasing class object
AMR.AMRSDK.trackIAPForAndroid( product.receipt,
				product.metadata.localizedPrice,
				product.metadata.isoCurrencyCode,
                tags,
                isDebug);
Explanation of parameters:
- receipt – The purchase receipt for this product
- localizedPrice – Decimal product price denominated in the currency indicated by isoCurrencySymbol.
- isoCurrencyCode – Product currency in ISO 4217 format; e.g. TRY or USD.
- tags – Distinction value for in-app purchase that used in multiple purposes.
- isDebug – It is an optional parameter. Default value is false. Set true for test purchases.
                    //Product refers UnityEngine.Purchasing class object
AMR.AMRSDK.trackIAPForIOS( product.transactionID,
				product.metadata.localizedPrice,
				product.metadata.isoCurrencyCode,
                tags);
- transactionID – A unique identifier for this product's transaction
- localizedPrice – Decimal product price denominated in the currency indicated by isoCurrencySymbol.
- isoCurrencyCode – Product currency in ISO 4217 format; e.g. TRY or USD.
- tags – Distinction value for in-app purchase that used in multiple purposes.
AMR.AMRSDK.trackPurchaseForAmazon(userId, receiptId, localizedPrice, marketPlace, isoCurrencyCode);
Explanation of parameters:
- userId (string) – The ID representing a distinct Amazon customer for the Amazon Appstore app: e.g purchaseResponse->userData->userId.
- receiptId (string) – Unique ID for the purchase: e.g purchaseResponse->receipt->receiptId
- localizedPrice (decimal) – Decimal product price denominated in the currency indicated by isoCurrencySymbol.
- marketPlace (string) – Amazon store marketplace country code for the currently logged on user. If you have isoCurrencyCode, you can leave marketPlace null.
- isoCurrencyCode (string) – ISO currency code for the current purchase response
AMR.AMRSDK.trackIAPForHuawei( receipt,
                signature,
                tags);
Explanation of parameters:
- receipt – The purchase receipt for this product
- signature – String containing the signature of the purchase data that the developer signed with their private key. It is returned by the system after you make the purchase call.
- tags – Distinction value for in-app purchase that used in multiple purposes.
You can listen callbacks of your in-app purchases for all platforms as shown below.
AMR.AMRSDK.setTrackPurchaseOnResult(trackPurchaseOnResult);
// You will be notified about the result of your purchase
public void trackPurchaseOnResult(string purchaseId, AMR.Enums.AMRSDKTrackPurchaseResult responseCode)
{
	Debug.Log("ADMOST - trackPurchaseOnResult : " + purchaseId + " " + responseCode);
}
Possible response codes you may have;
- SuccessfullyValidated(0) : "Valid purchase"
- FailedToValidate(1) : "Invalid Purchase"
- Exception(2) : "Temporary exception occurred, will be tried again later"
Setting Application User Id
You can use the following method to set application specific user id in AMR Analytics for enhanced tracking of your users. You have to call this method after initialization.
AMR.AMRSDK.setUserId("<applicationUserId>");
Setting Adjust User Id
Follow the official ADJUST documents to integrate AdjustSDK in to your app.
You can optionally use the following method to set adjust user id in Admost Analytics for enhanced tracking of your users. You have to call this method after initialization.
AMR.AMRSDK.setAdjustUserId("<adjustUserId>");
Server to Server Callbacks
For rewarded video ads, you can use Server to Server Callbacks for rewarding users after
successful completion of video ads. Please consult your business contact person for enabling it
and setting required parameters like callback URL, request verification token and method.
To use this feature, only requirement on application side is setting your application user id as
described here. You may also add new custom parameters to the callback
URL by setting custom data to the rewarded video object as shown in the
sample code below. This method has to be called before showing ad.
IDictionary parameters = new Dictionary();
parameters.Add("param1","One");
parameters.Add("param2","Two");
parameters.Add("param3","Three");

AMR.AMRSDK.setRewardedSSVCustomData(parameters);
Privacy Consent Required
You can optionally use the following method to check if the user is in a country which is subject to GDPR or CCPA.
AMR.AMRSDK.setPrivacyConsentRequired(privacyConsentRequired);
// The function below will be called just once when you subscribe the callback function as shown above
public void privacyConsentRequired(string consentType)
{
	Debug.Log("ADMOST - privacyConsentRequired : " + consentType);
	// Possible consentType values: "CCPA" , "GDPR" , "None"
}
Apple App Privacy
Starting December 8, 2020, Apple has announced a privacy disclosure for the App Store, You must define which data are collected by your apps and any SDKs you have integrated. To improve the performance of AdMost, the AMRSDK may collect following information from your apps:
- User ID – If you are using
setUserIdmethod to identify users with your custom app user ID, you will need to select 'User ID' - Purchases – If you are using in app purchase trackings methods, you will need to select 'Purchases'
- Coarse Location – To estimate the general location of a device
- Product Interaction – Analytics purposes
- Advertising Data – Analytics purposes
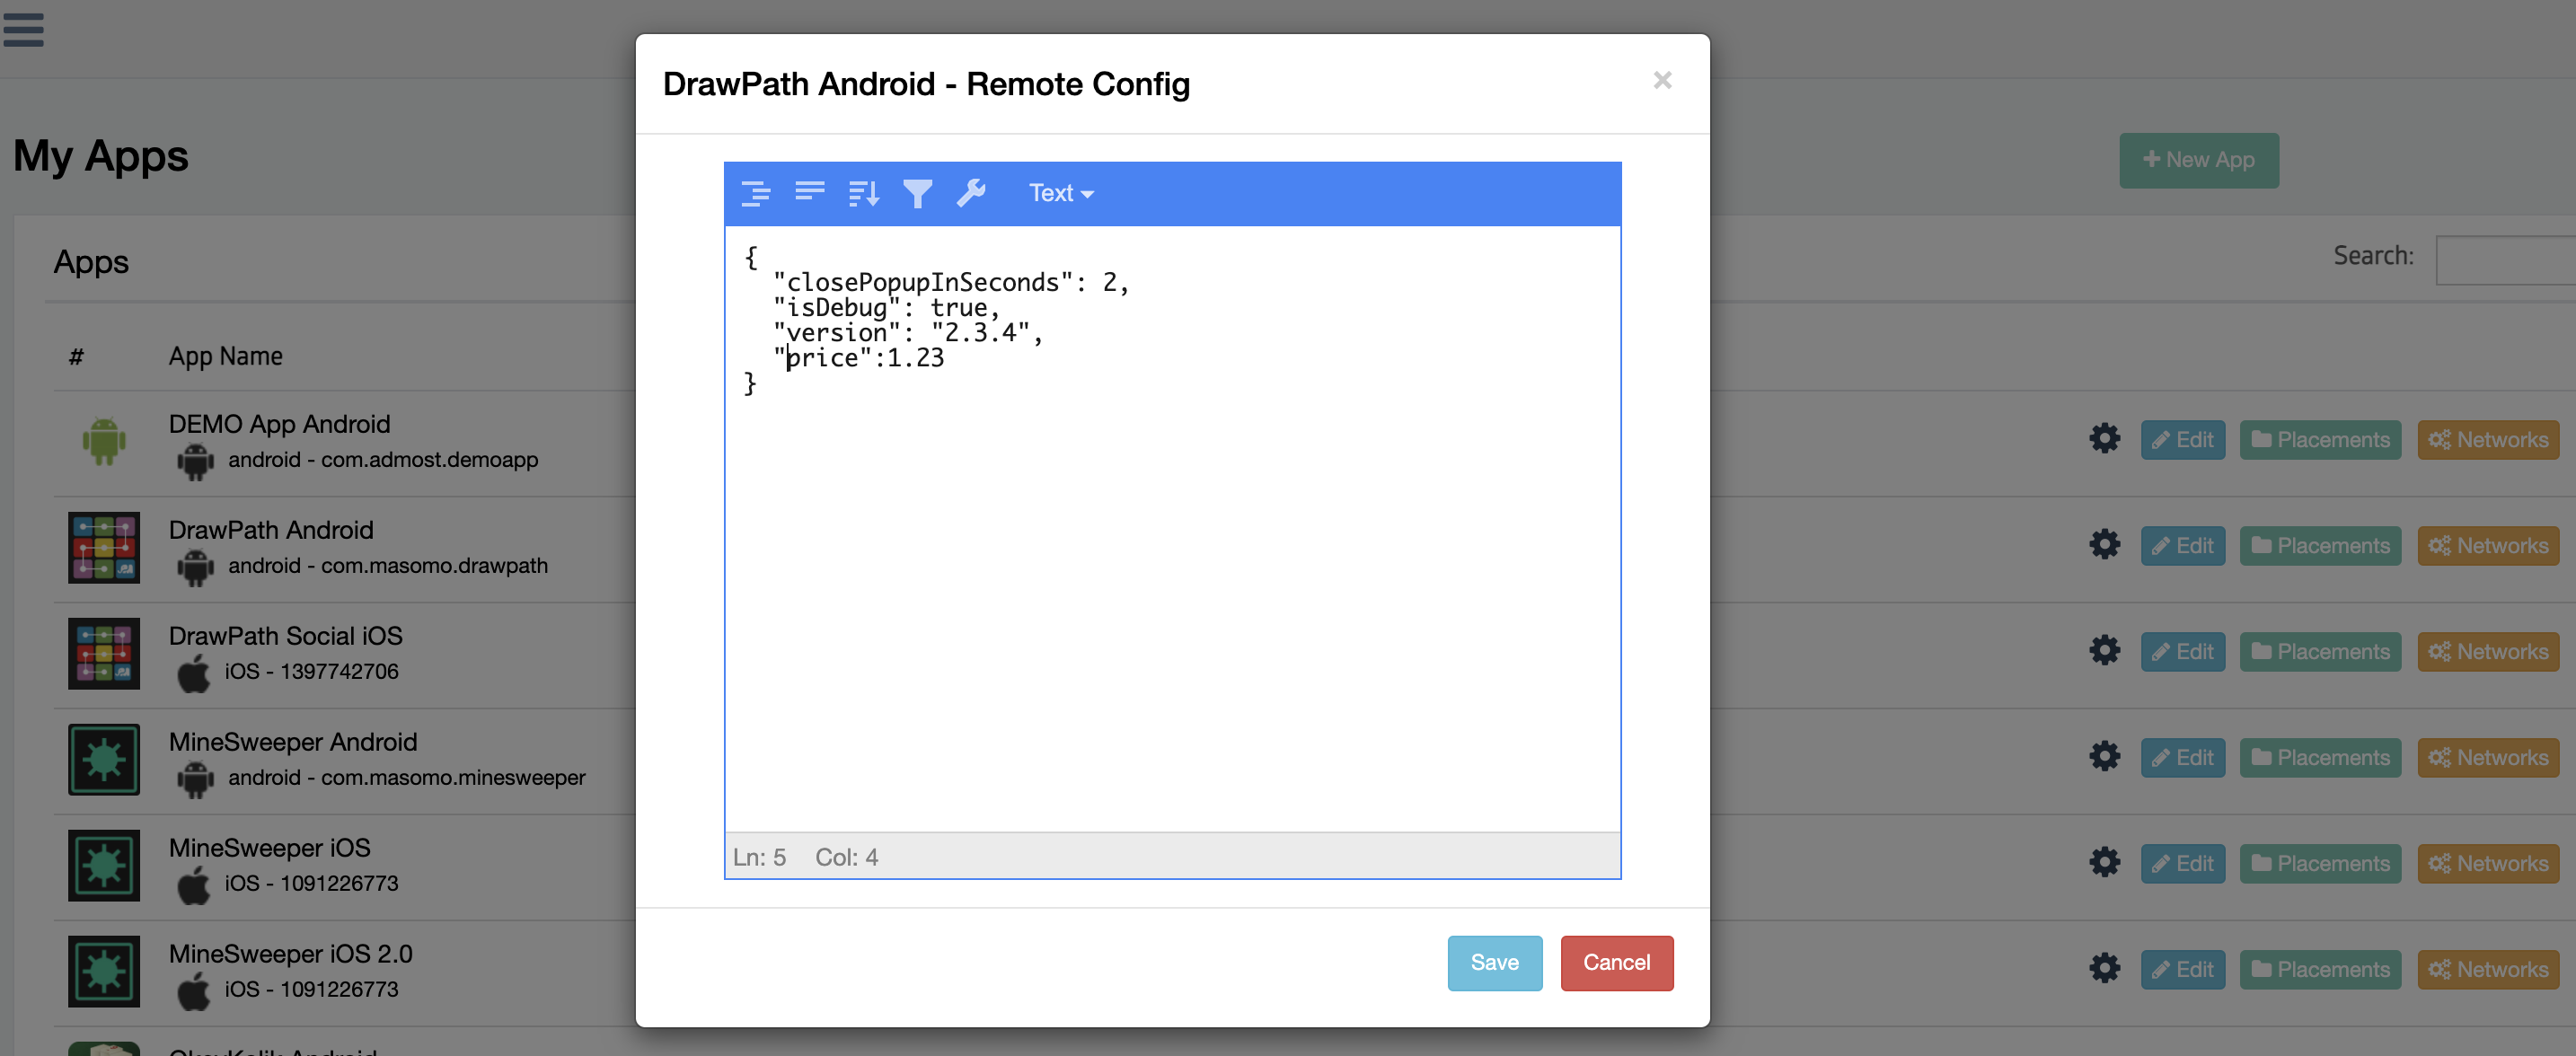
Remote Config
Admost Remote config is a feature for defining and updating server side parameters from the Admost dashboard. You can define the parameters in long, double, boolean and string types. To define parameters on Admost dashboard, click on settings icon on My Apps page and select Remote Config item from the list. The following page will pop up. You can define your parameters in this page in JSON format.
To read the parameter values in your app, you can use the following methods of the Admost sdk. It is suggested to use these methods after admost initialization completed, otherwise default values you set will be returned.
AMR.AMRRemoteConfig.getLong("closePopupInSeconds", 3);
AMR.AMRRemoteConfig.getString("version", "2.3.1");
AMR.AMRRemoteConfig.getDouble("price", 1.24);
AMR.AMRRemoteConfig.getBoolean("isDebug", false);
You can also run A/B tests for remote config parameters bundling with other mediation related test parameters. You do not have to do anything to run or join these tests on client side, random percentile targeting feature of the sdk will handle it itself. You can define these tests and target your audiences from the dashboard's A/B test menu.
A/B Test
AdMost A/B test feature is capable of doing in-game feature tests with remote config parameters as well beyond monetisation tests.
For using A/B test feature, you don't need to do anything on client side. All settings can be done over the AdMost Dashboard.
CMP(Consent Management Platform) Integration
Starting January 16, 2024 Publishers and developers using Google AdSense, Ad Manager, or AdMob will be required to use a Consent Management Platform (CMP) that has been certified by Google and has integrated with the IAB's Transparency and Consent Framework (TCF) when serving ads to users in the European Economic Area or the UK.
As Admost, we have integration with Google’s CMP tool User Messaging Platform (UMP). As a publisher, if you chose to continue with the UMP, you have to be sure about the following steps;
- Add UMP SDK into your app and complete the integration according to the UMP integration documentation.
- Create a proper GDPR message for your app on the UMP dashboard.
- Select all active ad networks and "Admost" as Vendor on the UMP dashboard.
- Check Auto UMP Detection checkbox on Admost dashboard application edit popup.
- Inform Admost SDK about the result of the Consent flow with the following lines
Before Initialization;
After Initialization;config.CanRequestAds = consentInformation.canRequestAds ? "1" : "0";AMR.AMRSDK.setCanRequestAds(consentInformation.canRequestAds);
If you are using CMP tool other than UMP, after completing the integration with the CMP tool you have to inform Admost SDK about the consent result of Custom Vendors including ADMOST before Admost initialization. Custom vendors can be any ad network used for monetization which are created manually and are not registered with IAB. Even if you don't have any extra custom vendors in your application, you have to add ADMOST as a custom vendor. You can use the following code snippet;
Dictionary<string, bool> parameters = new Dictionary<string, bool>();
parameters.Add("ADMOST",CONSENT_RESULT_BOOLEAN);
parameters.Add("APPLOVIN",CONSENT_RESULT_BOOLEAN);
AMR.AMRSDK.setCustomVendors(parameters);
Third Party A/B Test
If you are running an A/B test on another platform and want to track A/B test users on Admost cohort analysis page, you have to follow the following steps;
- Create an A/B test on Admost dashboard and connect your external A/B test with the new one
- Call the following method as soon as you get the proper A/B test and group id from the external platform
Call this method after Admost initialization
If the A/B test doesn't match with the id given on Admost dashboard, A/B test will not be followed on dashboard.AMR.AMRSDK.setThirdPartyExperiment("A/B test Id", "Group Id");
Group Id is free text field, it can have any value like "A", "B", "Group A" etc.
Track Admob Mediation Revenue
If you are using Admob Mediation platform, you can send impression-level revenue data to Admost analytics. To be able to do that, first, you have to configure impression-level ad revenue (ILAR) in Admob. Afterward, you can listen to the impression level revenue callbacks of Admob ads and share it with Admost as shown in the following code snippet using the data provided by the callbacks.
Call this method after Admost initialization
AMR.AMRSDK.trackAdmobMediationRevenue(AMR.Enums.AMRSDKAdFormat.REWARDED, revenue, "placementId", "adUnitId");